User Features
The features described in this section are accessible to any authenticated user of the application. AI Support offers the same conversations through two interfaces: the full Chat view, which provides a conversational interface for interacting with AI assistants, and the chat bubble, a floating window available on any page of the application.
Chat
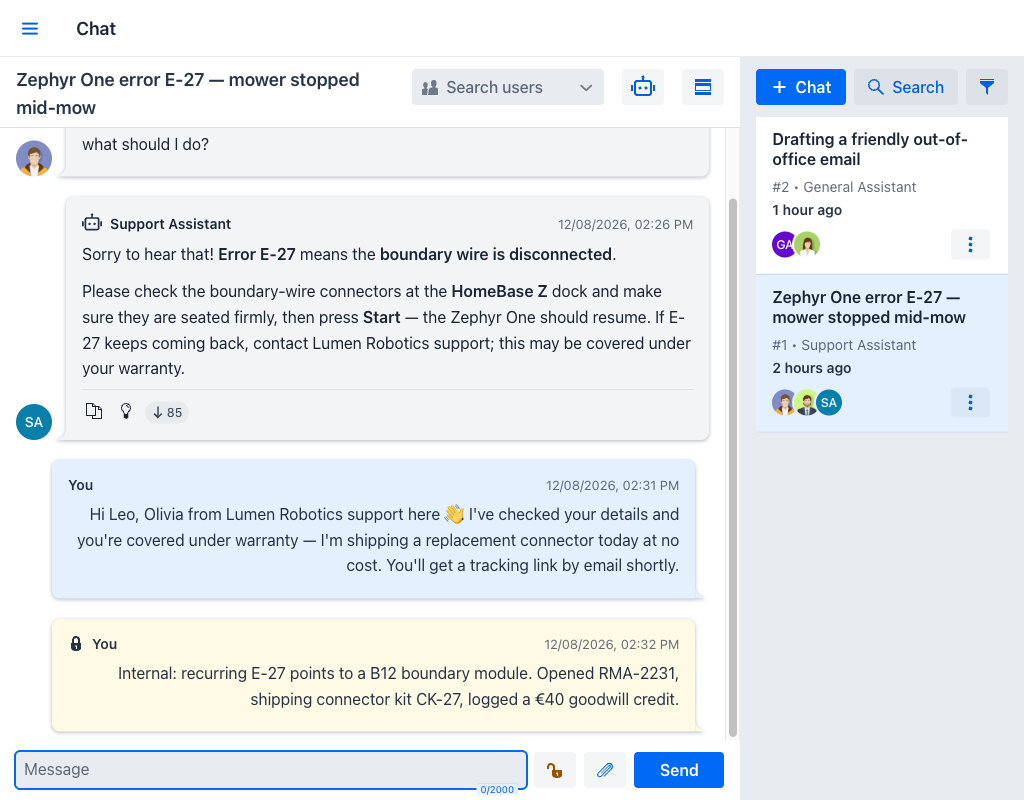
The Chat view is the central feature of the AI Support appjar. It allows users to have conversations with AI-powered assistants that can answer questions, provide guidance, and reference documentation relevant to the application. The view is organized as a two-panel layout: the main conversation area on the left and a session sidebar on the right.
Starting a New Conversation
To begin a new conversation, click the + Chat button located at the top of the session sidebar. The main area displays To start a conversation, select an assistant and send a message. The assistant selector is located in the toolbar at the top of the conversation area, represented by a robot icon. Clicking this icon opens a dropdown menu listing all available assistants.
Once an assistant is selected, type a message in the input field at the bottom of the conversation area and click the Send button or press Enter. The AI assistant processes the message and streams a response in real time. While the response is being generated, the assistant is shown as is thinking, and a Stop button becomes available, allowing the user to halt generation at any point if the answer is already sufficient or headed in the wrong direction. A message whose generation was stopped early is marked with an Early badge and the note Generation stopped by followed by the name of the user who stopped it. If generation fails, the message is marked Failed.
The assistant assigned to a new conversation is the one marked as the default by an administrator. Users can change the assistant before or during the conversation using the assistant selector in the toolbar. If the assistant is changed mid-conversation, subsequent responses use the newly selected assistant's configuration, including its language model, prompt, and document categories.
An assistant can only be used when its own configuration, its language model, and its prompt are all enabled. Assistants that fail this test are still listed, and selecting View status on one opens the Assistant status dialog, which shows the assistant, its LLM, and its prompt as separate rows marked enabled or disabled. This explains why an assistant is unavailable without requiring administrator access.
Draft Messages
Text typed into the message input is preserved per assistant. When the user returns to a conversation with unsent text, a dialog offers to Restore draft or to Ignore it. Drafts are removed once the message is sent, and when a session is closed.
The Conversation Area
The conversation area displays all messages exchanged in the current session. Each message shows the sender's name and avatar, the timestamp, and the message content. Messages from the AI assistant are rendered with full markdown support, including code blocks with syntax highlighting, lists, headings, inline formatting, and Mermaid diagrams. A diagram that cannot be parsed is replaced by a notice that the diagram contains syntax errors.
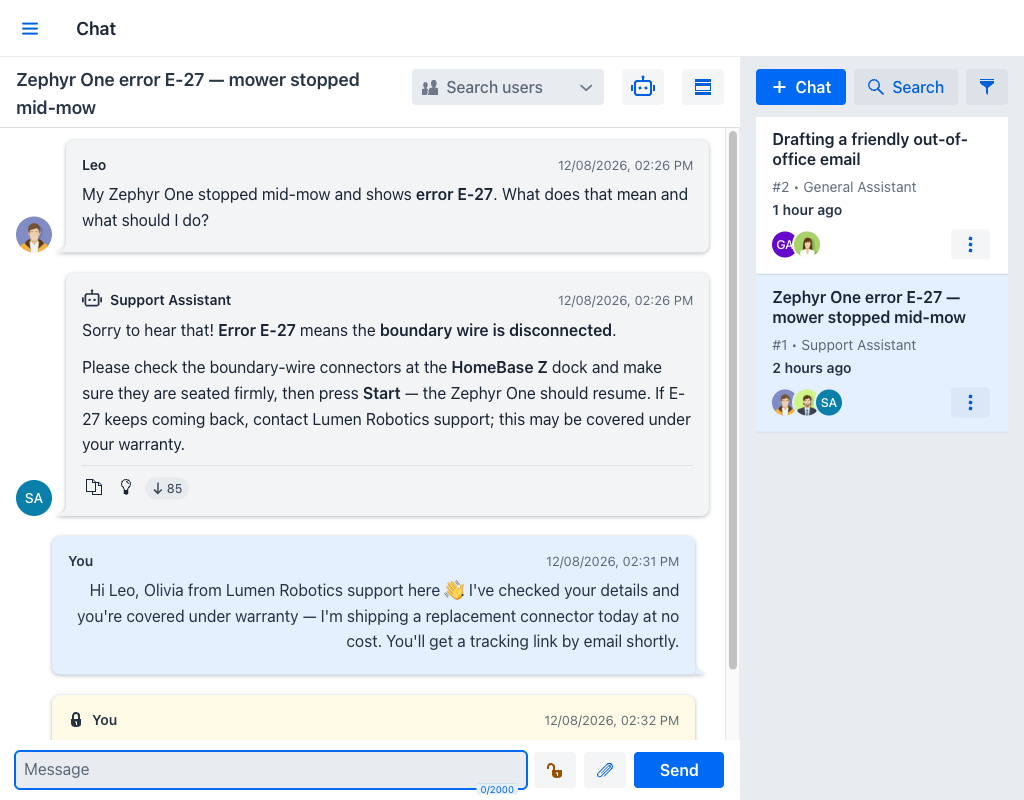
Hovering over an assistant message reveals a row of actions beneath it:
- Copy message content: Copies the message text to the clipboard.
- Inspect exchanged data: Opens the exchange behind the message in the LLM Inspector. Available to administrators.
- Token count: The number of tokens the model used to generate the message, shown as a small badge.
Attachments on a message are listed below its text, each with a Download action, and a Preview action for the types that can be displayed in the browser.
Users can include the following in their messages:
- Plain text: Standard text messages sent to the assistant.
- File attachments: Files can be attached to a message before sending. Click the paperclip icon (Attach files) located next to the message input field to open the attachment dialog. The dialog contains a file upload area where files can be selected from disk or dragged and dropped, and states the limits that apply: the maximum size per file (10 MB unless the administrator raises it), the maximum number of files per message (three by default), and the accepted file types. To remove a file before sending, click the remove icon on its chip in the attachment selector; Remove attachments discards all of them at once. Supported file types include documents (PDF, plain text, DOC, DOCX, LOG), images (JPG, JPEG, PNG), audio (MP3, AAC, OGG, WAV, FLAC), and video (MP4, AVI, WebM, MKV, MOV). Attached files are included as additional context alongside the message text. Which of these the assistant can actually read depends on the language model behind the selected assistant: attachments the current assistant does not support are removed, with the notice Some attachments were removed because they are not supported by the current assistant.
- User mentions: In multi-participant conversations, users can mention other participants to direct their attention to a specific message. Type
@followed by the user's name to trigger the mention autocomplete; the mentioned user is notified that they were mentioned. Mentioning someone who is not yet a participant adds them to the conversation. Two mention targets are not users:@assistantasks the assistant for a response, which is how an answer is requested while the conversation is in manual mode, and@administratorasks for human help. The autocomplete labels them Request response and Request help.
Session Management
Every conversation in AI Support is organized as a session. Sessions appear in the sidebar on the right side of the Chat view, listed in reverse chronological order based on their last activity. Each session card in the sidebar displays the session summary (automatically generated from the conversation content), the session number, the assistant name, the time of last activity, participant avatars, and the current rating if one has been provided.
A card also carries two indicators. A counter shows how many messages have arrived since the user last opened that session, as 1 new message or N new messages. An Alerts badge marks sessions the user has subscribed to.
Sessions have three possible statuses:
- Active: The conversation is ongoing. Both the user and the assistant can exchange messages.
- Archived: The conversation has been archived. It remains visible for reference but is no longer active for new messages.
- Closed: The conversation has been explicitly closed. No further messages can be sent. When a non-administrator user closes a session, a rating dialog is presented automatically.
The actions menu on each session card (represented by a vertical three-dot icon) offers:
- Close: Closes the session after a confirmation. A session cannot be closed while the AI assistant is generating a response.
- Delete: Permanently removes the session with all its messages, attachments, draft messages, and participant information. A session cannot be deleted while the assistant is answering.
- Link: Copies a link to the session to the clipboard, so a conversation can be shared with another user who has access to it. Individual messages have their own Copy message link action.
- Subscribe / Unsubscribe: Turns alerts for the session on or off. See Alerts.
Warning
Deleting a session is a permanent action. All messages, attachments, and associated data will be permanently removed and cannot be recovered.
Alerts
By default a user is notified about a conversation only while looking at it. Subscribing to a session asks for a notification every time a new message is published in it, which is useful for a conversation that someone else is expected to answer.
Use Subscribe in the session actions menu and confirm; subscribed sessions show an Alerts badge in the sidebar. Unsubscribe stops the notifications. Subscriptions are per user, so subscribing does not affect what other participants receive.
Searching and Filtering Sessions
The session sidebar provides two tools for finding specific conversations.
Search opens the Search sessions or messages dialog, which matches the text against both session summaries and message content and reports how many of each it found. When a search matches more than the dialog can show, it says so and asks for a narrower term. A Show closed chats option includes closed sessions in the results. Selecting a result opens that session, positioned on the matching message.
Filter opens the Session filters dialog, whose fields can be combined:
- Summary: Matches text in the session summary.
- Status: Filters by active, archived, or closed.
- Rating: Filters by the rating given to the session, with an Unrated option for sessions still awaiting one.
- Created by: Filters by the user who started the session.
- Participants: Filters by the users taking part, with Active participants only to exclude those who have left.
- Assistant: Filters by the assistant assigned to the session.
- Channel and Type: Filter by the messaging channel a conversation arrived through and by the session type.
- Creation date ranges and Last activity date ranges: Filter on either timestamp, using From, Until, and At time bounds. Use last activity date switches which of the two timestamps the range applies to.
Participants
By default, a conversation involves only the user who created it and the AI assistant. Additional users can be invited to join. Use the Search users dropdown in the toolbar at the top of the conversation area to find and add participants; every action asks for confirmation first, naming the user affected. Once added, all participants can read and send messages within the session.
The participants panel lists everyone who has taken part, each with the moment they joined — the user who started the conversation is marked Started this chat — or the moment they left. A participant who has not written yet is shown as such rather than with an empty activity.
The available actions depend on who the participant is:
- Remove takes another participant out of the conversation; Leave is the same action applied to oneself.
- Bring back returns a participant who had been removed; Join back is the same action applied to oneself.
- An administrator viewing a conversation they are not part of can join it directly.
The assistant itself is a participant and can be replaced by another one, which the confirmation describes as replacing one assistant with the other.
Every arrival and departure is recorded in the conversation as a system message, such as Olivia added Leo to the conversation or Leo left the conversation, so the history explains who could see what and from when. A user who is removed while viewing the session is told that they have been removed.
All participants see messages in real time. Typing indicators show when another participant is composing a message, naming the user, or reporting that multiple users are typing.
Rating a Conversation
After a session is closed, users are prompted to rate the conversation. The rating dialog allows the user to assign a numerical rating and optionally provide a comment explaining their experience. This feedback is visible to administrators and can be used to assess the quality of AI responses and fine-tune the assistant configuration.
Sessions that have been closed but not yet rated are highlighted in the sidebar, and a notification banner appears at the top of the Chat view reminding the user to rate their pending sessions. Users can filter the session list to show only unrated sessions for easy access.
Automatic and Manual Mode
Conversations can operate in two modes:
- Automatic mode: This is the default mode. The AI assistant automatically processes each user message and generates a response. This is the standard conversational experience.
- Manual mode: In this mode, the AI assistant does not automatically respond to user messages. This mode is useful when a human administrator or support agent takes over the conversation and handles responses directly.
The mode is toggled with the Switch assistant response button in the conversation toolbar. Switching to manual mode is useful when the AI response is not sufficient and human intervention is needed, while switching back to automatic mode resumes AI-assisted responses. Either change is recorded in the conversation as a system message stating that assistant response has been enabled or disabled, and by whom.
In manual mode a participant can still ask the assistant for a single answer by mentioning it, as described below.
Private Mode
Administrators can write messages that only other administrators see. The padlock button beside the message input, Switch admin-private conversation, turns private mode on and off for the messages that follow. Turning it on reports Private mode activated. Your messages are visible to administrators only, and turning it off reports that they are visible to everybody again.
Private messages are visually distinct in the conversation area and carry a padlock, so it is always clear which part of a thread the end user can read. They are useful for internal notes, coordination between support staff, or annotations that should not reach the customer. The LLM Inspector marks the same messages Private.
Private mode is only available to administrators. The assistant still answers a message sent in private mode, but its reply is private as well, so the exchange stays hidden from the other participants.
Free Mode Limits
Without a licence, AI Support allows 50 messages per day across the application. A Daily Messaging badge at the top of the Chat view counts the messages sent today against that limit, and changes colour as the limit approaches. Its tooltip states when the count resets, expressed in the user's own time zone; the allowance resets at midnight.
Once the limit is reached, sending is refused with Messaging limit reached. Contact the administrator, and attachments report Free limit reached. Installing a licence removes the limit and the badge.
The Chat Bubble
Opening the Chat view means leaving whatever page the user was on. For a short question — what a field means, how to complete the task in front of them — that is often too much interruption. The chat bubble solves this: a floating button sits above the application on every page, and opens a compact chat window over the current page without navigating away.
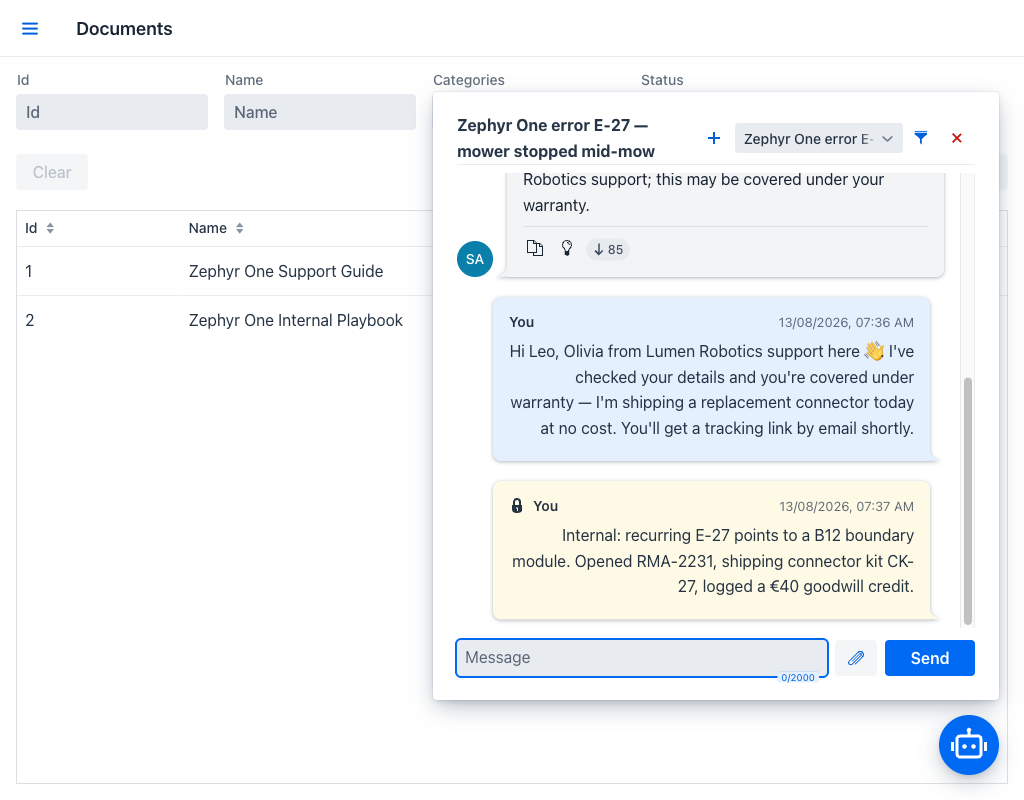
The bubble is not a reduced copy of the Chat view. It works on the same conversations, with the same assistants and the same messages, so a conversation can be started in the bubble and continued later in the full view, or the other way round. Attachments, mentions, markdown responses, streaming, private mode, and the free-mode limit all behave as described above.
Moving and Resizing
The floating button can be dragged anywhere on the page, which matters when it covers something the user needs to see. It cannot be dragged off-screen: released near an edge, it animates back to sit within a small margin of the viewport, and it is repositioned automatically if the browser window is resized. Dragging is distinguished from clicking by distance, so a small movement still counts as a click and opens the window.
The chat window itself can be resized by dragging any of its edges or corners, from a compact box up to a large panel, for conversations that need more room. Expand chat window in the header does the same in one click, switching between the standard size and a larger one; once expanded the same control becomes Restore chat window size. Reset bubble position returns the floating button to its default corner after it has been dragged somewhere inconvenient.
Both the button's position and the window's size apply to the current page visit. Reloading the page restores the defaults.
On a narrow screen the window opens full screen instead, since there is no room for a floating panel. Resizing and repositioning make no sense in that mode, so Expand chat window and Reset bubble position are shown but disabled.
The Window Header
The header of the chat window has two rows. The upper row names the conversation currently loaded and carries the controls that act on the window:
- Expand chat window / Restore chat window size: Switches the window between its standard and enlarged size.
- Reset bubble position: Moves the floating button back to its default position.
- Close window (×): Hides the window. The conversation is left untouched, and clicking the floating button opens it again.
The lower row carries the controls that act on conversations:
- Search: Opens the search dialog, which looks through the user's conversations and their messages. Choosing a result loads that conversation and scrolls straight to the matching message.
- Filter: Narrows the conversation selector using the same session filters as the Chat view. A badge indicates when filters are active.
- The conversation selector: A dropdown listing the user's conversations, each with its summary, number, and assistant. A conversation with unread messages shows the count beside it. Selecting one loads it into the window; typing in the field searches the list by summary.
- Chat actions: A menu holding the actions that apply to the loaded conversation — Link copies a deep link to it, Close closes the conversation after a confirmation, and Delete removes it after a confirmation. Each entry is available only when the action applies, and the whole menu is disabled until a saved conversation is loaded.
- New chat (+): Starts a new conversation, exactly as + Chat does in the Chat view.
Staying Informed While Working Elsewhere
The point of the bubble is that it can be ignored until it matters, so it reports activity in two ways.
The floating button carries a badge with the number of unread messages across all of the user's conversations, not only the one currently loaded. It is the single indicator to watch while working elsewhere in the application.
A message arriving in a conversation other than the one open in the window also raises a short notification showing a preview, which is the fastest way to notice a reply without watching the badge. These previews are deliberately limited: a conversation only raises them if the user has subscribed to its alerts, and a user is never notified of their own messages, of messages they have already seen, or — unless they are an administrator — of administrator-only messages. Streaming fragments and system messages do not raise notifications either, so a single reply produces one notification rather than a stream of them.
Being mentioned, and being added to or removed from a conversation, are also reported through the bubble, so an invitation to a conversation reaches the user wherever they are in the application.