Access Rules
Access Rules allow administrators to define runtime access control rules that determine which roles can access which views in the application. Unlike access requirements defined in the application code at development time, Access Rules let administrators modify access requirements dynamically, without code changes or an application redeployment.
Overview
The Access Rules feature is the most distinctive aspect of User Manager. It provides administrators with a flexible, rules-based system for controlling view accessibility based on user roles.
Accessing the Access Rules View
The Access Rules view is one of the administrator views provided by User Manager. The way it is reached from the navigation depends on how the host application organizes its menu.
Rules Listing
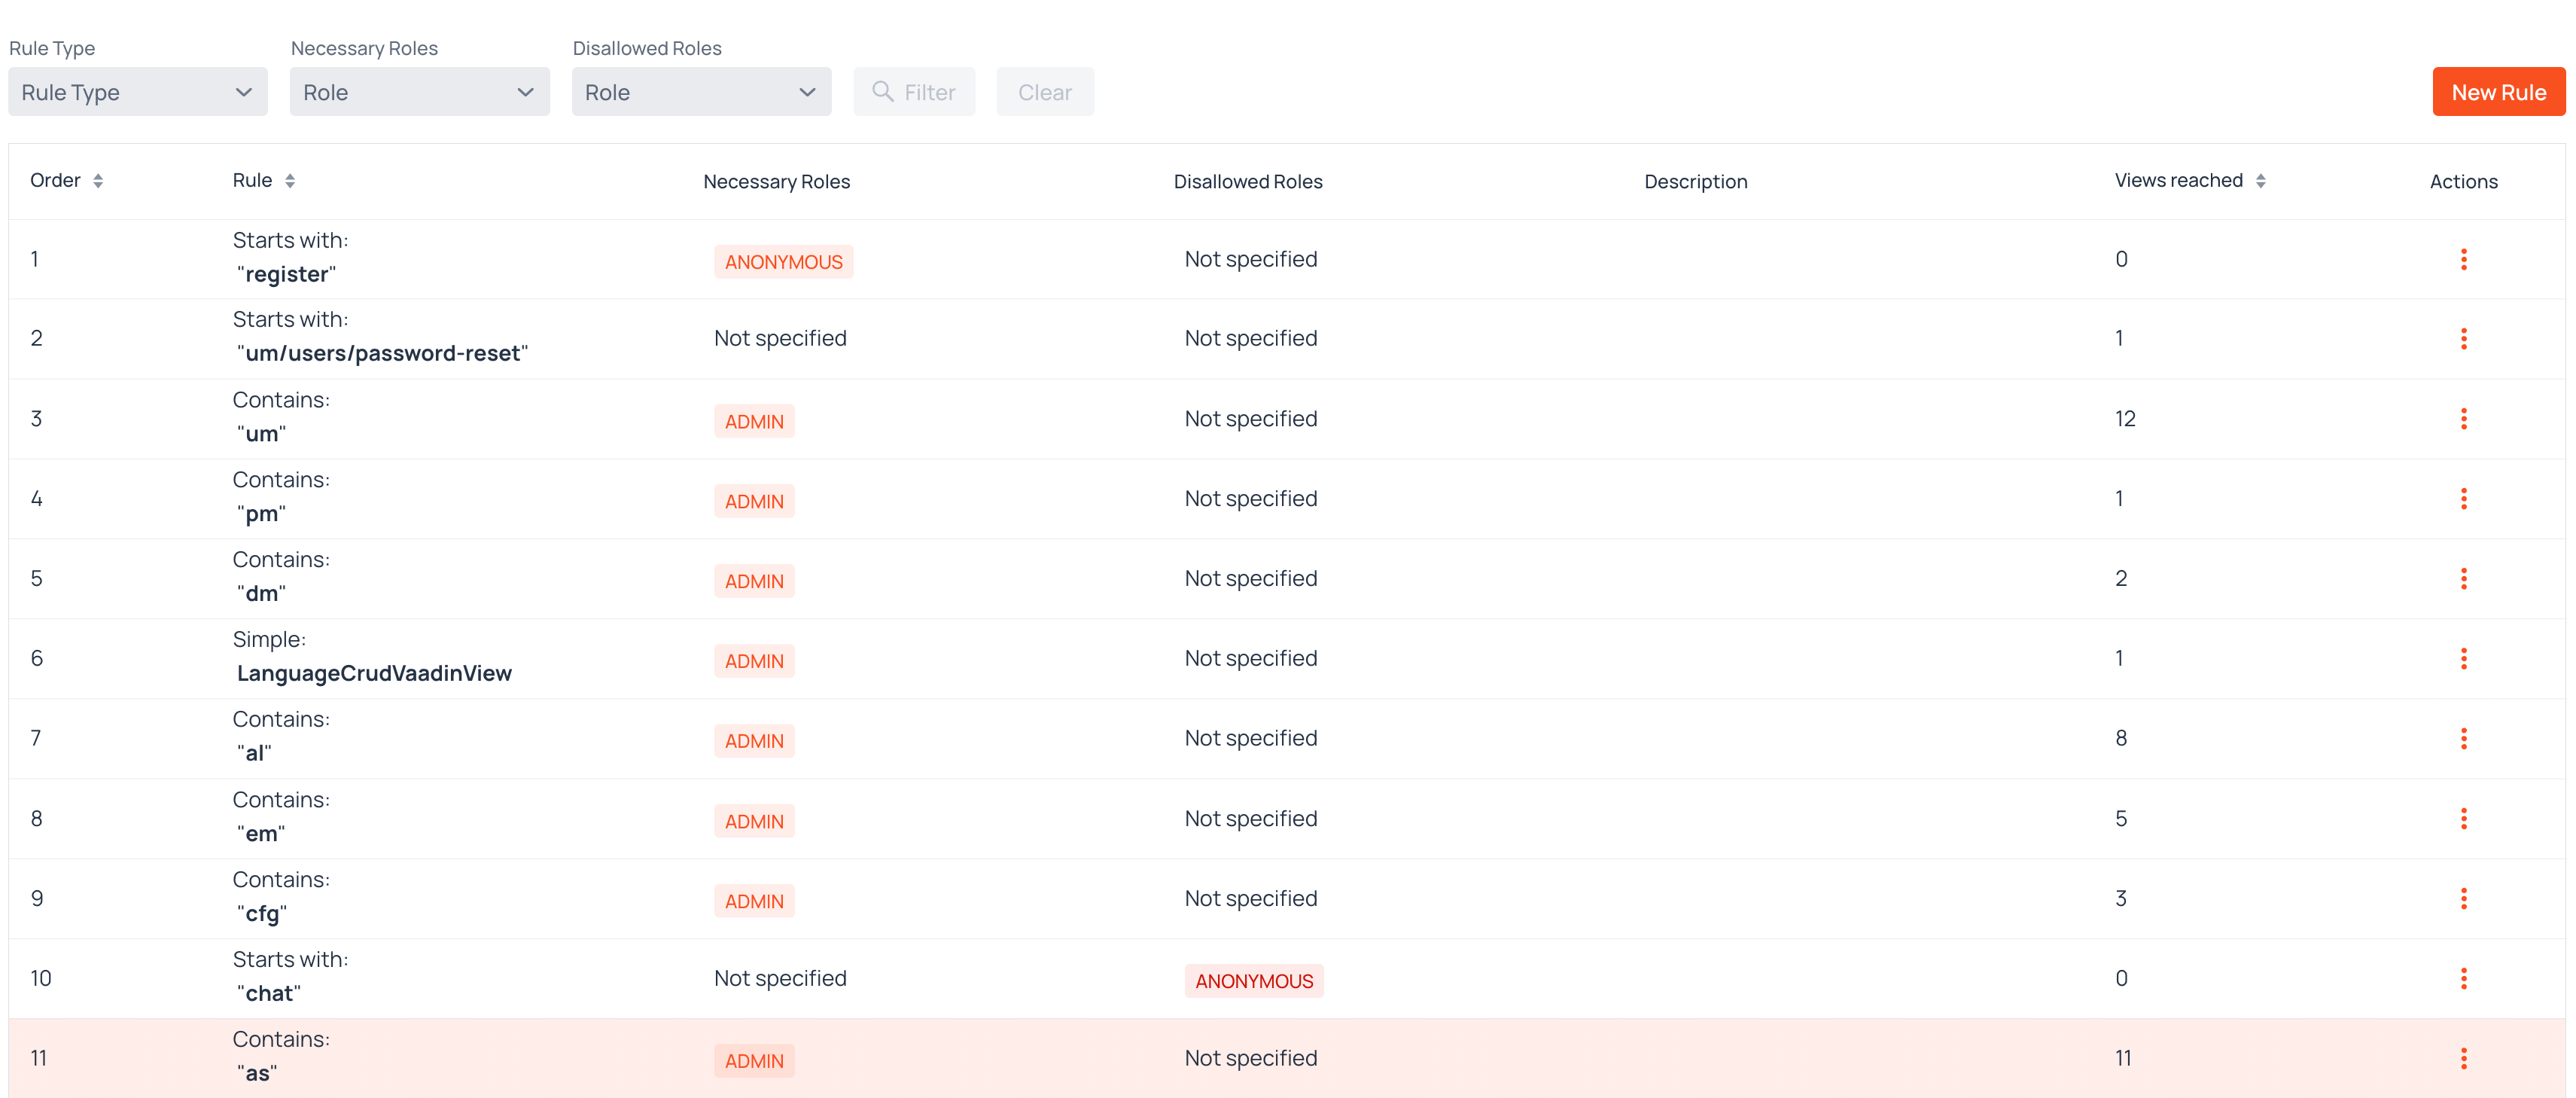
The Rules Listing displays all configured access rules in a grid format with filtering and management capabilities.
Filter Options
Above the grid, several filters allow administrators to narrow down the displayed rules:
- Rule Type: Dropdown to filter rules by matching type (Simple, Starts with, Ends with, Contains, Regex)
- Roles: Multi-select combo box that shows only rules configured with all of the selected roles
- Authorization: Dropdown to filter rules by their authorization criteria
Once any filter has a value, the Filter and Clear buttons become enabled. The Filter button applies the current filter selections, and Clear resets all filters.
Two buttons sit to the right of the filters: Views by role opens the access preview, and New Rule opens the rule creation dialog.
Grid Columns
The rules grid displays the following columns, in this order:
- Order: Priority number that determines the evaluation order of rules
- Rule: The rule type and its specification — view names for the Simple type, the URL pattern for the others
- Authorization: The authorization criteria applied when the rule matches. To learn more, see authorization
- Roles: Role badges showing the roles the criteria is evaluated against
- Description: Free text description of the rule's purpose
- Views reached: Count of application views affected by this rule
- Enabled: Toggle that takes the rule in and out of evaluation. To learn more, see enabling and disabling a rule
- Actions: Dropdown menu providing Edit, Duplicate, and Delete options
On narrow screens the Authorization, Roles, Description, and Views reached columns are hidden, and clicking a row expands a detail panel that shows the same values.
Enabling and disabling a rule
The Enabled toggle takes a rule out of evaluation without deleting it. A disabled rule is skipped when access is decided, but keeps everything else — including its position in the Order sequence — so switching it back on restores the previous behaviour without any reconfiguring or reordering. Disabled rows are dimmed in the grid, while the toggle itself stays fully legible.
This is the preferred way to try out a change to the rule set: deleting a rule instead renumbers every remaining rule.
If turning a rule off would cost the current administrator access to the Access Rules view, the same warning described in current user access warning appears first, and cancelling it leaves the toggle as it was.
Reordering Rules
Rule priority is changed by dragging rows to a new position in the grid. Drag a row and drop it between two other rows; the Order column updates automatically to reflect the new priority sequence.
Rules are evaluated from the lowest to the highest Order value, so dragging a rule toward the top of the list raises its priority. Because the first matching rule decides on its own, a specific exception must sit above the broader rule it overrides.
Dragging is unavailable in Free mode once the user limit has been exceeded, along with the other rule management actions. To learn more, see Free mode.
Creating a Rule
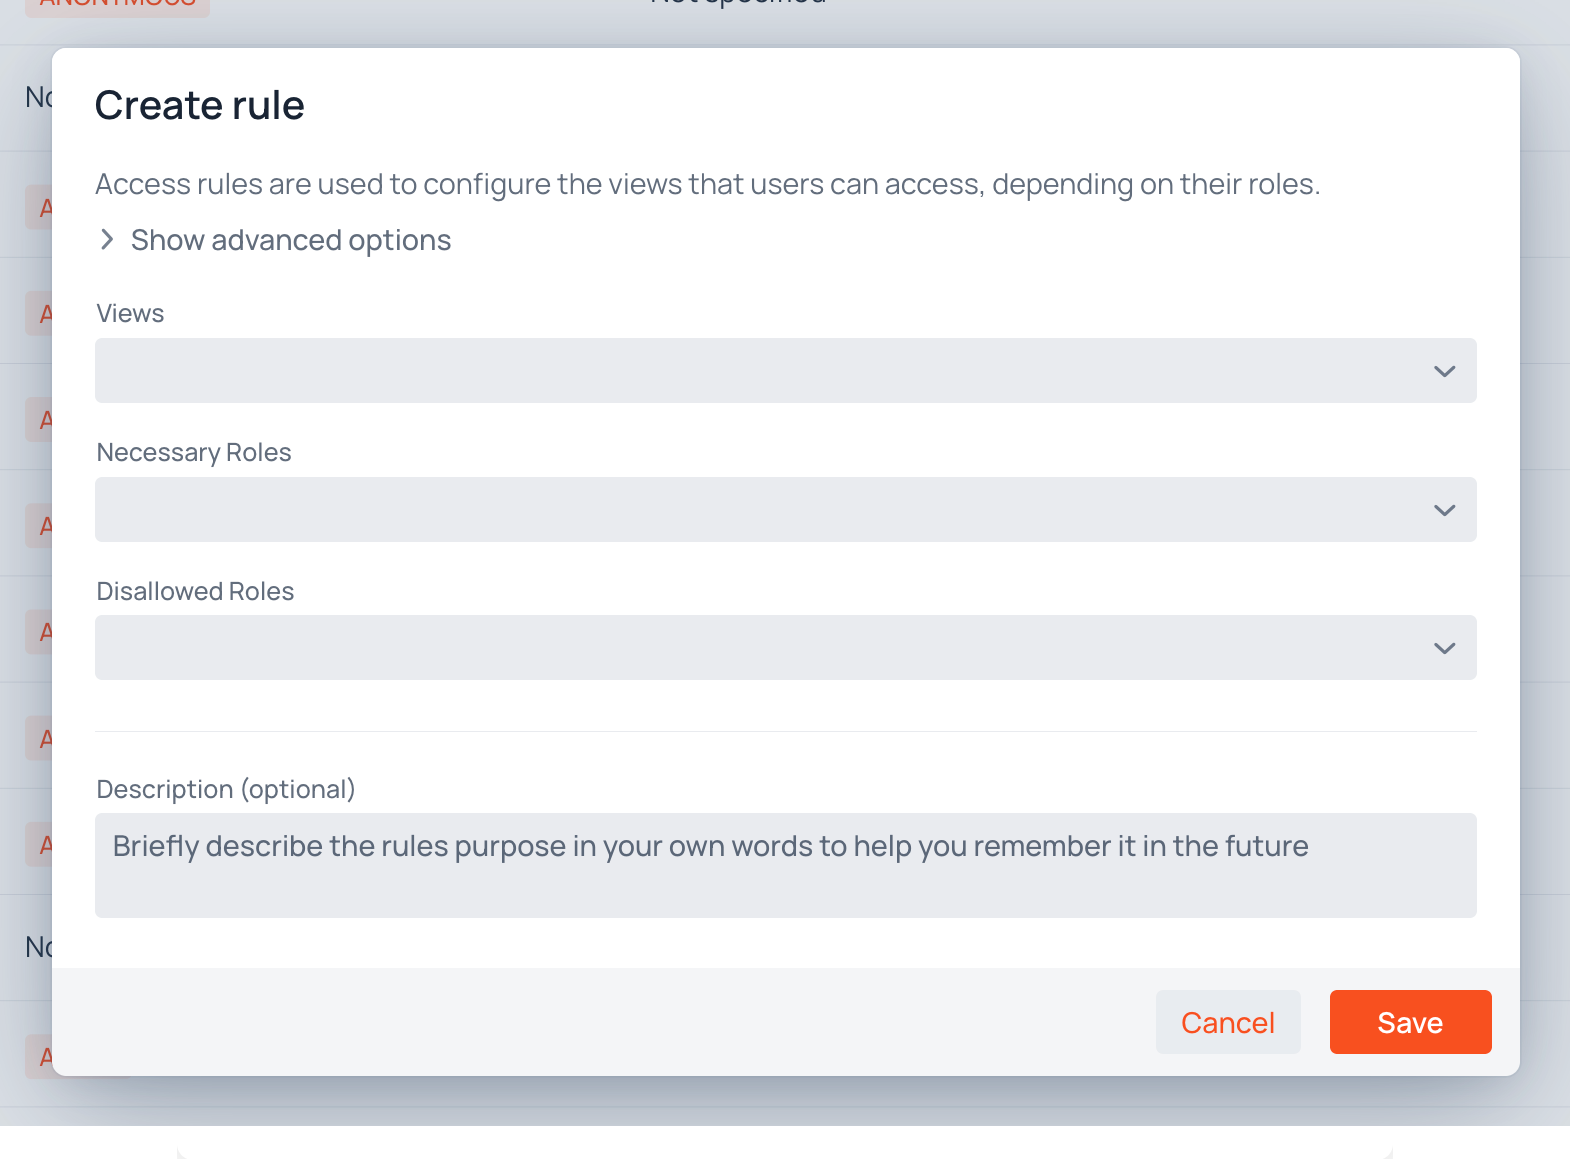
To create a new access rule, click the New Rule button in the Rules Listing. The rule creation dialog opens.
Rule Creation Dialog
The creation dialog contains the following fields and sections:
Show advanced options (collapsed by default)
When expanded, the Show advanced options accordion reveals:
- Order: Integer field specifying the rule's priority. Required field, must be greater than 0. Rules are evaluated in order from lowest to highest Order value.
- Rule: Combo box for selecting the rule type, with the following options:
- Simple
- Starts with
- Ends with
- Contains
- Regex
When the accordion is collapsed, the rule type defaults to Simple.
Rule Specification
The fields in this section depend on the selected rule type:
For Simple type: - Views: Multi-select combo box showing all available application views. Select the specific views to which this rule applies.
For Starts with, Ends with, Contains, and Regex types:
- Text pattern: Text field for entering the URL pattern that matches view paths
- Consider query parameters: Checkbox, available for the Ends with, Contains, and Regex types only. When checked, the trailing query string of a URL — the part after the ? — takes part in the match. Route parameters are always part of the URL being matched, whether or not this box is checked.
Validation: Every rule must target something. A Simple rule requires at least one view, and a pattern rule requires a non-empty pattern. A Regex rule additionally requires a valid regular expression. To deliberately write a rule that reaches every route, use a Regex rule with the pattern .*.
Authorization
- Authorization: Required combo box that determines who is granted access when the rule matches. It offers four criteria:
- Grant if the user has all the following roles: The user must have every selected role.
- Grant if the user has any of the following roles: The user must have at least one of the selected roles.
- Accessible for all logged in users: Any authenticated user, regardless of their roles.
- Unrestricted: Everyone, including users who are not logged in.
- Roles: Multi-select combo box listing the roles the criteria is evaluated against. The field appears only for the two role-based criteria, and is hidden for Accessible for all logged in users and Unrestricted, which do not consider roles.
Validation: At least one role must be selected when either role-based criteria is chosen.
Note
A matching rule is decisive: it grants or denies access on its own, and no lower-priority rule is consulted afterwards. There is no separate list of disallowed roles — a rule denies access to everyone its criteria does not grant it to.
Description
- Description (optional): Text area for entering a human-readable description of the rule's purpose and behavior.
Dialog Buttons
- Cancel: Closes the dialog without saving changes
- Save: Creates the rule with the specified configuration
Rule Types Explained
Simple: Select specific views from a dropdown list. This type provides precise control over individual views.
Starts with: Match views whose URL path starts with the given pattern. Useful for controlling access to an entire section of the application.
Ends with: Match views whose URL path ends with the given pattern. Include or exclude the query string using the Consider query parameters checkbox.
Contains: Match views whose URL path contains the given pattern anywhere in the path. Include or exclude the query string using the Consider query parameters checkbox.
Regex: Match views whose URL path matches the given regular expression pattern. Include or exclude the query string using the Consider query parameters checkbox. This type provides the most flexible pattern matching.
Simple and Starts with rules always ignore the query string: a Simple rule is compared segment by segment against the path, and a Starts with pattern is unaffected by whatever follows it.
Editing a Rule
To edit an existing rule:
- In the Rules Listing, click the Actions dropdown menu for the rule
- Select Edit
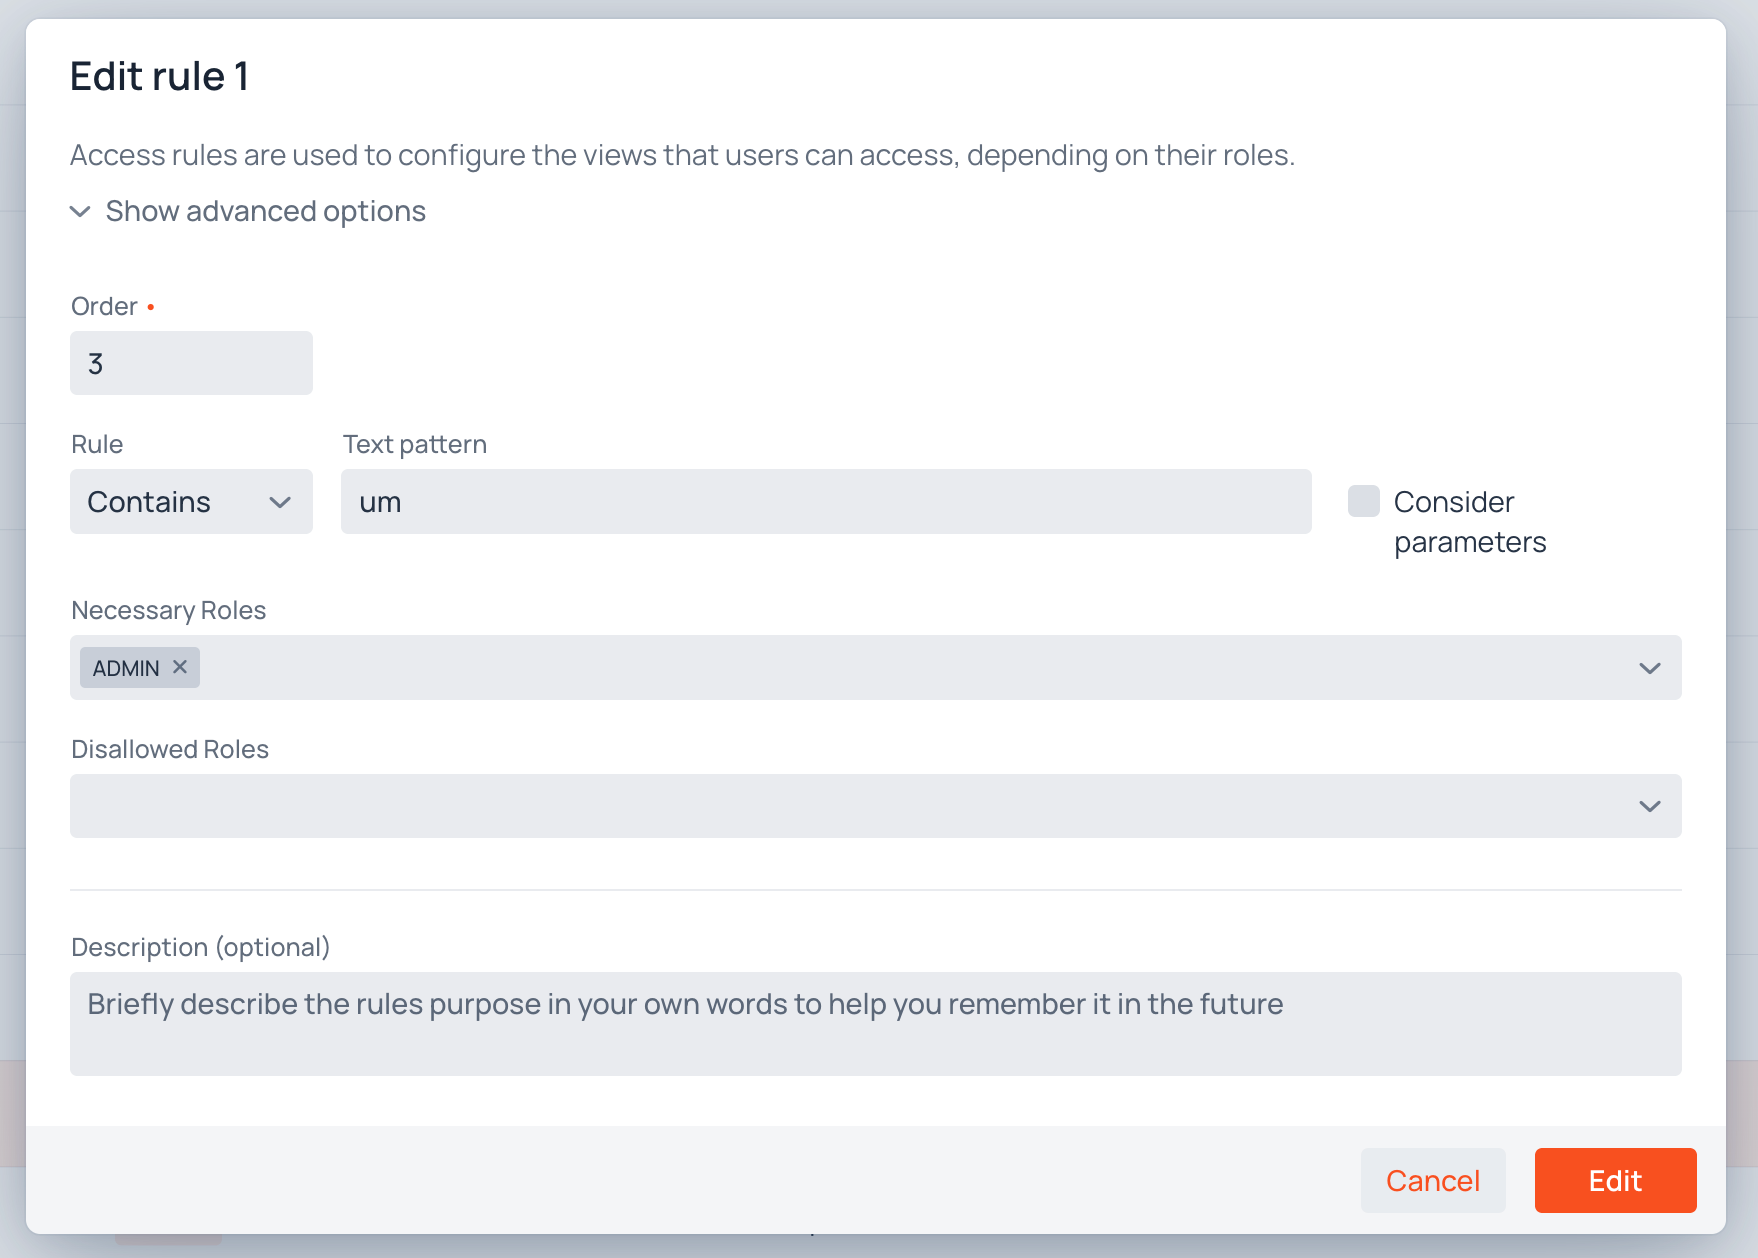
The rule editing dialog opens with all current values populated. This dialog is identical to the creation dialog, with the addition of a Delete button.
Dialog Buttons
- Delete: Permanently removes the rule (error style, left side). Opens a confirmation dialog.
- Cancel: Closes the dialog without saving changes
- Save: Saves changes to the rule configuration
Duplicating a Rule
Selecting Duplicate from the Actions dropdown menu opens the creation dialog pre-filled with a copy of the chosen rule's configuration. Nothing is saved until the copy is confirmed, so the fields can be adjusted first. This is the quickest way to write a rule that differs from an existing one in only its pattern or its roles.
Current User Access Warning
If a change would cause the current administrator to lose access to the Access Rules view itself, a warning dialog appears before the change is applied. It states the consequence and asks for confirmation, which prevents administrators from accidentally locking themselves out of rule management.
The check runs on every action that can alter the outcome of the rules:
- Saving a rule from the creation or editing dialog
- Deleting a rule, from either the Actions menu or the editing dialog
- Switching a rule off with the Enabled toggle
- Reordering rules by dragging a row
Cancelling the warning leaves the rule set untouched.
Deleting a Rule
To delete a rule:
- In the Rules Listing, click the Actions dropdown menu for the rule
- Select Delete
Or, if editing the rule, click the Delete button in the rule editing dialog.
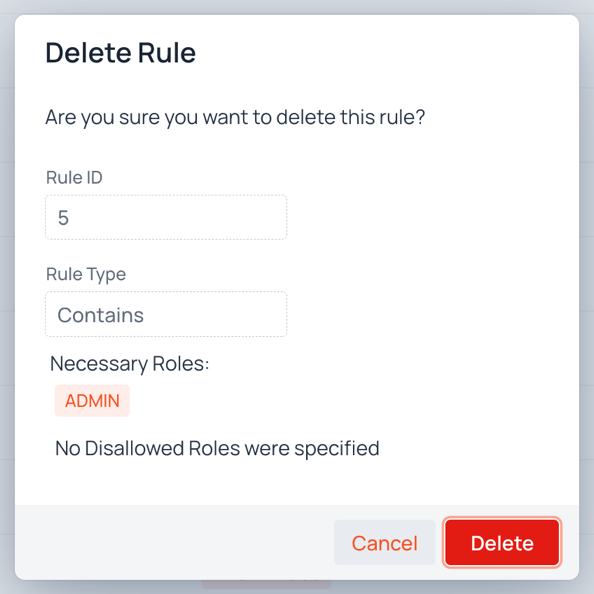
A confirmation dialog appears displaying:
- Rule ID: The numerical identifier of the rule
- Rule Type: The matching type of the rule
- Authorization: The authorization criteria configured on the rule
- Roles: Badges for the roles the criteria is evaluated against
Rule Deletion is Permanent
Deleting a rule cannot be undone. The rule is permanently removed from the system, the remaining rules are renumbered, and any access control previously provided by the rule no longer applies. To take a rule out of evaluation while keeping it, use the Enabled toggle instead.
Rule Evaluation Order
Rules are evaluated in the order specified by their Order value, from lowest to highest. The evaluation process:
- Rules are processed sequentially by Order value, skipping any rule whose Enabled toggle is off
- The first rule matching the accessed view is decisive: it grants or denies access according to its authorization criteria, and no further rule is consulted
- If no rule matches the view, the access requirements declared in the application's code apply instead
Because the first match decides, a rule intended as an exception to a broader policy must have a lower Order value than the broad rule, so that it is reached first.
Previewing Access by Role
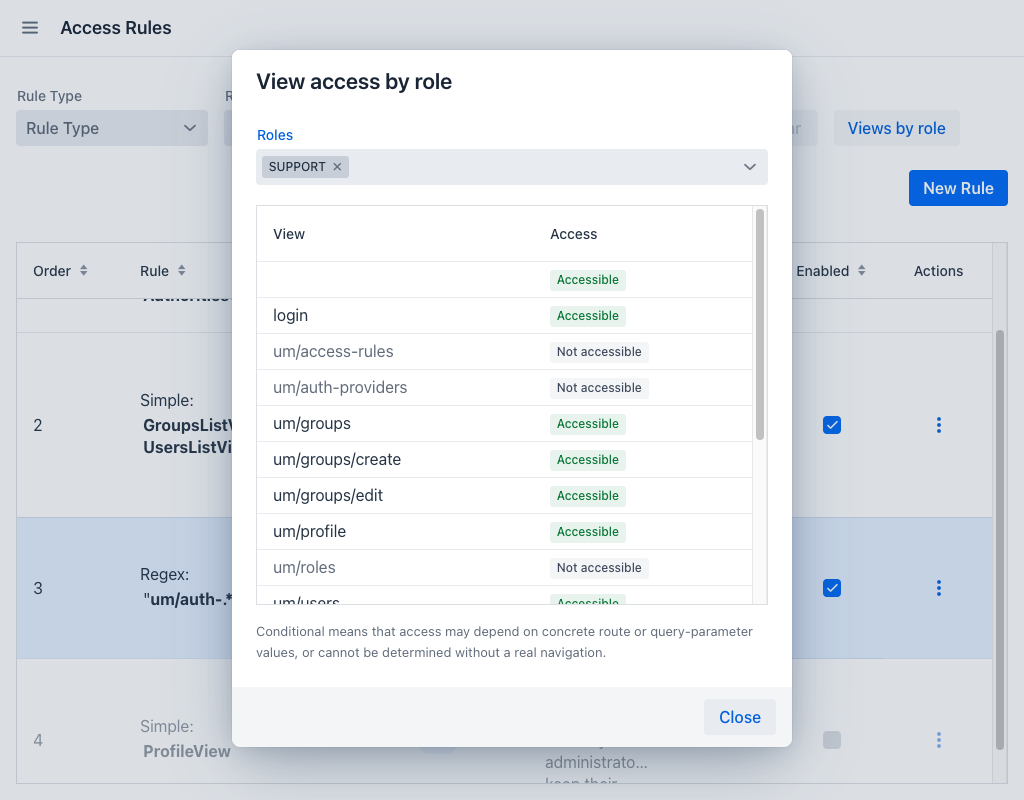
The Views by role button above the grid opens a dialog that answers the reverse question: rather than which views a rule reaches, it shows which views a given set of roles can reach.
Select one or more roles in the Roles field, and the dialog lists every registered view with its resulting access:
- Accessible: A user holding the selected roles can reach the view
- Not accessible: The view is out of reach for those roles
- Conditional: Access may depend on concrete route or query-parameter values, or cannot be determined without a real navigation
The preview evaluates the rules exactly as navigation does — the first matching rule decides, and the view's access requirements in the code are consulted only when no rule matches — so it is a reliable way to review a rule set before it goes into effect.
Note
When the application supplies its own fallback access checker, that checker cannot be evaluated outside a real navigation, and the views it governs are reported as Conditional. The dialog states this whenever it applies.