Documents
The Documents view allows administrators to manage the knowledge base that AI assistants use when answering user questions. Documents are the source material for Retrieval-Augmented Generation (RAG) — when a user sends a message, the system searches through the document embeddings to find relevant passages and includes them as context for the language model's response.
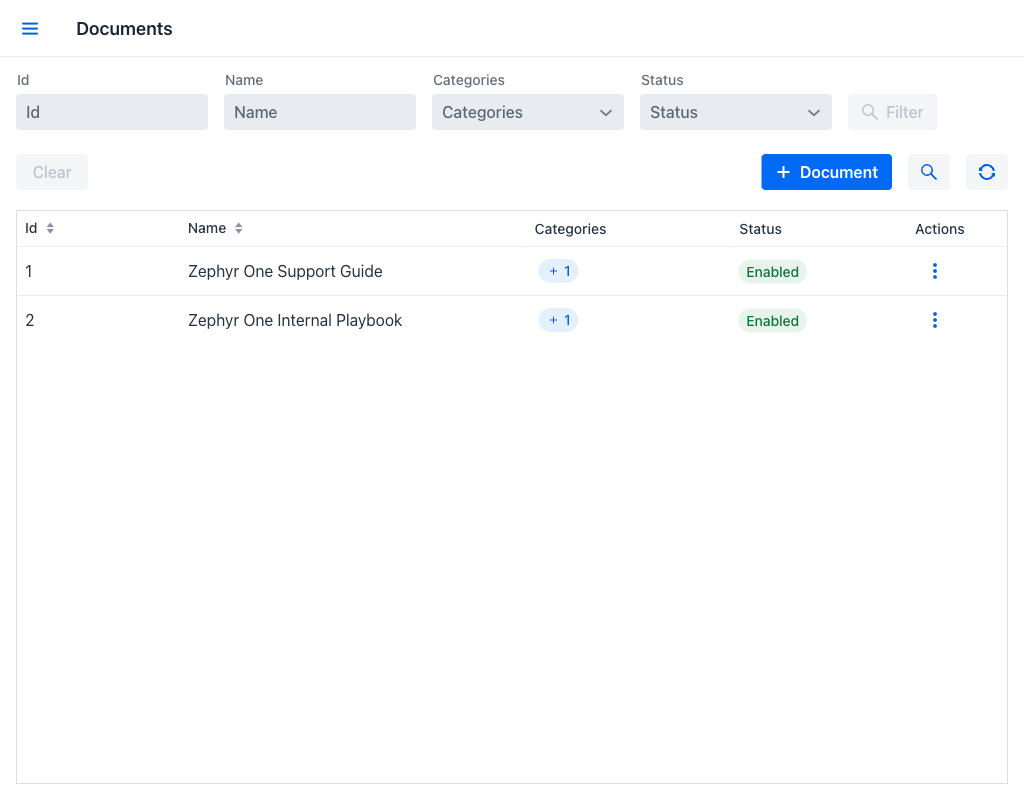
Documents Grid
The grid displays the following columns:
- Id: Unique numeric identifier of the document.
- Name: The display name of the document.
- Categories: Badges showing the categories the document belongs to. Categories determine which assistants have access to this document during RAG processing.
- Status: A badge indicating whether the document is enabled or disabled. Disabled documents are excluded from RAG searches.
- Actions: A per-row actions menu.
A document whose content is still being processed is marked Processing, and an information icon on its row explains that the submitter will be notified when processing completes.
Filters
The view provides the following filter fields:
- Id: Filters by the document's numeric identifier.
- Name: Filters documents whose name contains the entered text.
- Categories: A multi-select dropdown that filters documents associated with any of the selected categories.
- Status: A dropdown to filter by enabled or disabled status.
Once any filter field has a value, the Filter and Clear buttons become active.
At the top right of the filter area are three controls: the + Document button, which opens the dialog for uploading a new document; a magnifier button, which opens Vectorial Search; and a refresh button, which reprocesses every document, described in Reprocessing Documents.
Row Actions
Click the actions menu on any row to access the following options:
- Edit name: Makes the Name cell editable in place. The grid, not a dialog, is where a document is renamed; the file itself cannot be replaced after upload.
- Enable / Disable: Toggles the document's enabled status. Disabled documents are not included in RAG searches.
- View content: Opens the content viewer for the processed text of the document.
- Delete: Removes the document and all its associated embeddings. A confirmation dialog is displayed before deletion.
Warning
Deleting a document permanently removes it and all its embeddings from the system. Any assistants that relied on this document for context will no longer have access to its content.
Uploading a Document
Clicking the + Document button opens the Add document dialog:
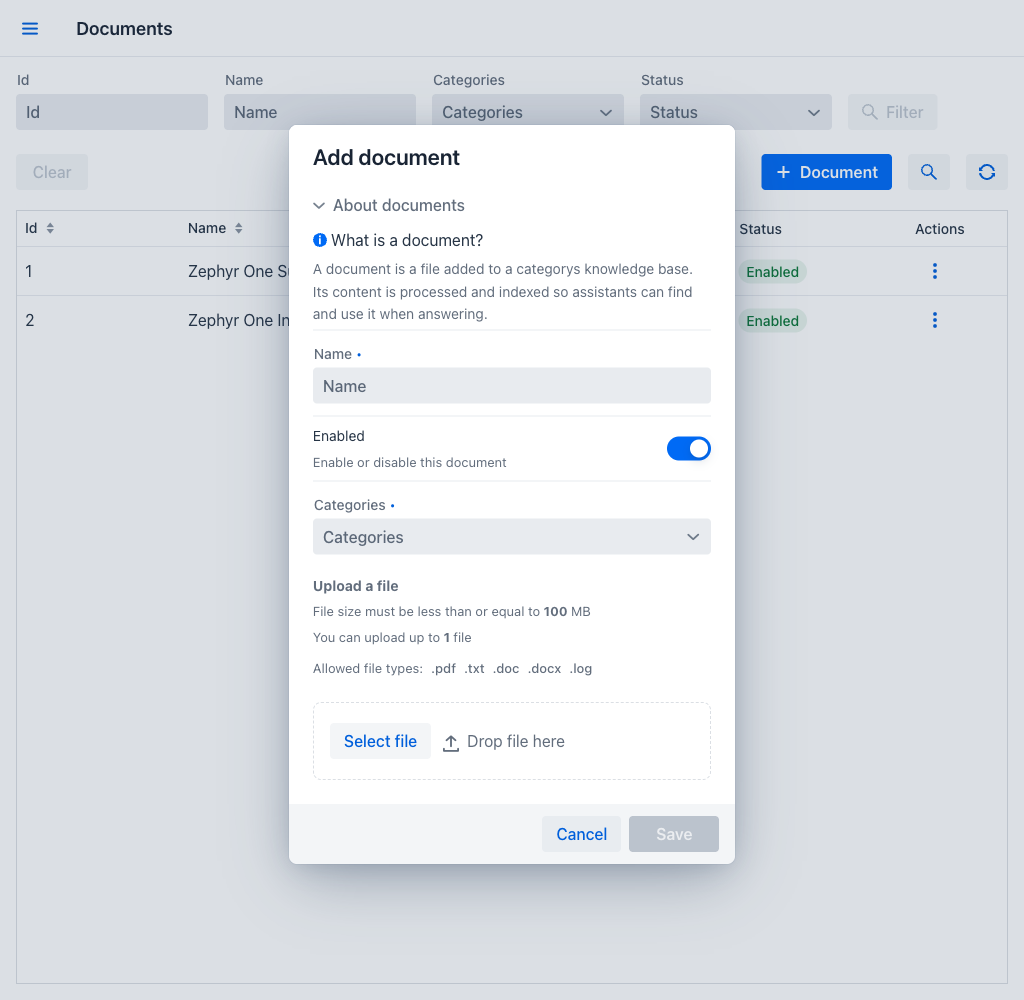
- Name (required): The display name for the document. Must be unique across all documents.
- Enabled: A toggle that determines whether the document is included in RAG searches. Enabled by default.
- Categories (required): A multi-select dropdown for associating document categories. An assistant will only search this document if at least one of its categories matches the assistant's configured categories.
- Upload a file: A drag-and-drop area for the file, which also states the limits that apply. Accepted types are .pdf, .txt, .doc, .docx, and .log — the knowledge base is built from text, so images, audio, and video cannot be uploaded here. One file is uploaded per document.
The dialog opens with an About documents section explaining what a document is.
When a document is uploaded, the system processes its content into smaller chunks and generates vector embeddings for each chunk. Processing runs in the background: the document appears in the grid marked Processing, and the administrator who submitted it is notified when it completes.
Viewing Document Content
The View content row action opens a viewer for the processed text of a document — what the assistants actually retrieve from, rather than the original file.
The viewer presents the text in sections, reporting the current section and the total, together with the character count and the number of tokens. Previous section and Next section move between them. A Find occurrences field searches within the content, reports how many matches were found, and Previous occurrence and Next occurrence step through them.
This is the practical way to confirm that a file was parsed as expected, and that a specific passage really is present in the knowledge base.
Reprocessing Documents
The refresh button in the toolbar reprocesses all documents. The confirmation dialog explains that the action re-indexes every document using the current embedding model and may take a while.
Reprocessing is required after the embedding model changes, because embeddings produced by different models are not comparable. It is also the remedy when retrieval returns nothing useful and the stored chunks are suspected to be stale.
The button is disabled while any document is still being processed, so a reprocessing run cannot overlap with an upload that has not finished. Each document is reprocessed in the background, and a notification is raised as each one completes.
Vectorial Search
The magnifier button at the top right of the Documents view opens the Vectorial Search dialog, which performs semantic searches directly against the document embedding store. This tool is useful for verifying that the RAG retrieval returns the expected results for a given query before testing it through the full chat interface.
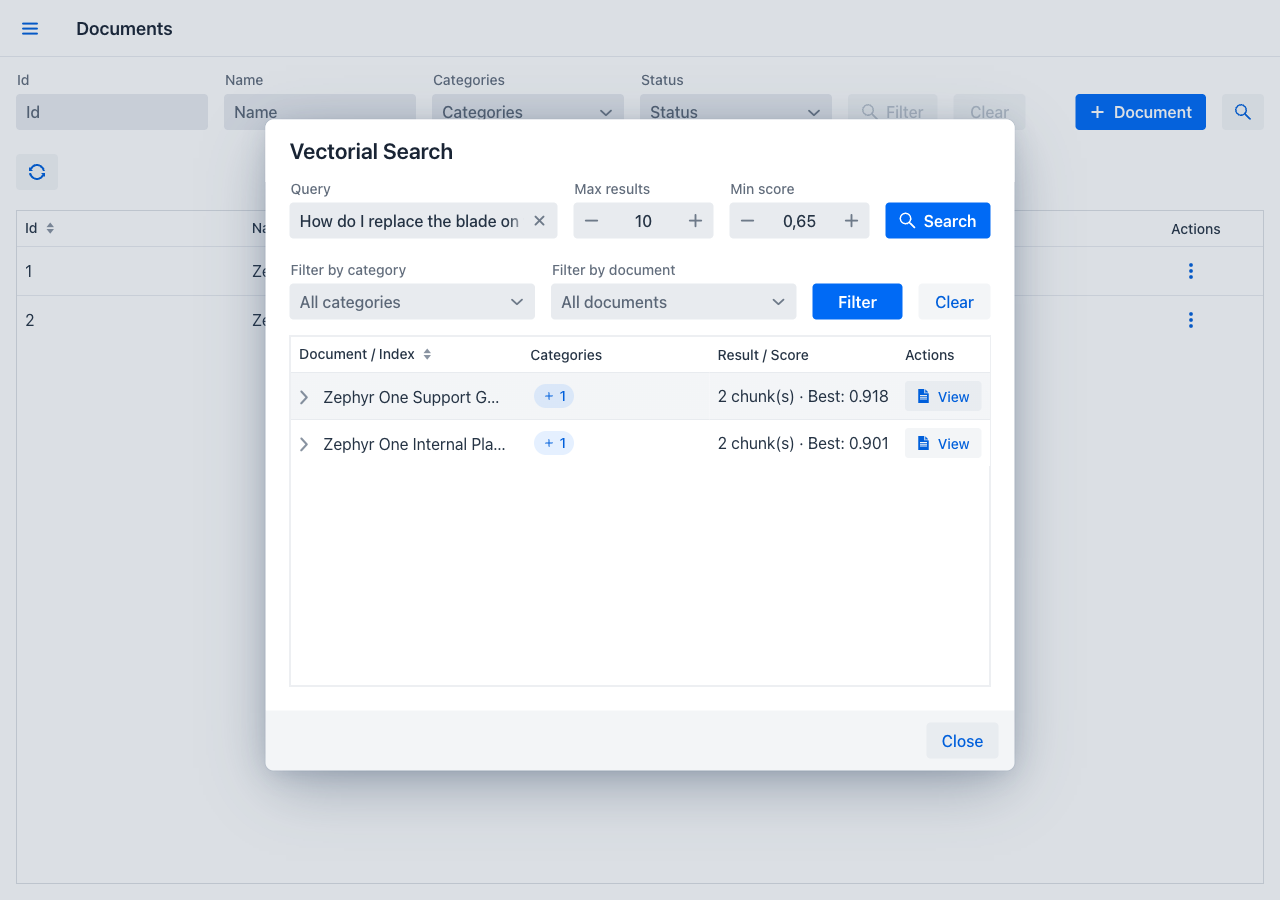
Running a Search
Enter a natural-language query in the Query field and click the Search button (or press Enter). The system converts the query into an embedding vector and returns the document chunks whose embeddings are most similar to it, ranked by cosine similarity score.
Two parameters control the search scope:
- Max results: The maximum number of matching chunks to return. The default is 10; the allowed range is 1 to 50.
- Min score: The minimum similarity score (from 0.0 to 1.0) a chunk must reach to be included in the results. The default is 0.65. Increasing this threshold returns only high-confidence matches; decreasing it returns more results that may be less relevant.
These two values apply to this dialog only. They are deliberately more permissive than the thresholds the assistants use at conversation time, which are set in the application configuration.
When nothing matches, the dialog suggests trying a different query or lowering the minimum score.
Interpreting Results
Results are displayed in a hierarchical tree grid grouped by document, with the columns Document / Index, Categories, Result / Score, and Actions. Each document node shows the document name, its categories, the number of matching chunks, and the best score among them. Expanding a document node reveals the individual matching chunks, each with its own similarity score. Chunks belonging to no category are grouped as Uncategorized.
Clicking the View button on a document node opens all matching chunks from that document combined in reading order. Clicking View on an individual chunk opens a detail panel showing the chunk text alongside its Metadata — the score, the document name, the chunk index, and the category information.
Filtering Results
After a search, the Filter by category and Filter by document dropdowns become available above the results grid. These filters narrow the displayed results without re-running the search: selecting one or more categories shows only chunks belonging to those categories, and selecting specific documents limits the results to those documents. Both default to including everything, shown as All categories and All documents.
Clicking Filter applies them and Clear resets both, restoring the full result set from the last search.