Channels
The Channels view allows administrators to configure the messaging integrations through which the AI assistant communicates with users outside the application. Each channel represents a connection to an external messaging platform — WhatsApp, Facebook Messenger, or Instagram — and links that platform to a specific AI assistant.
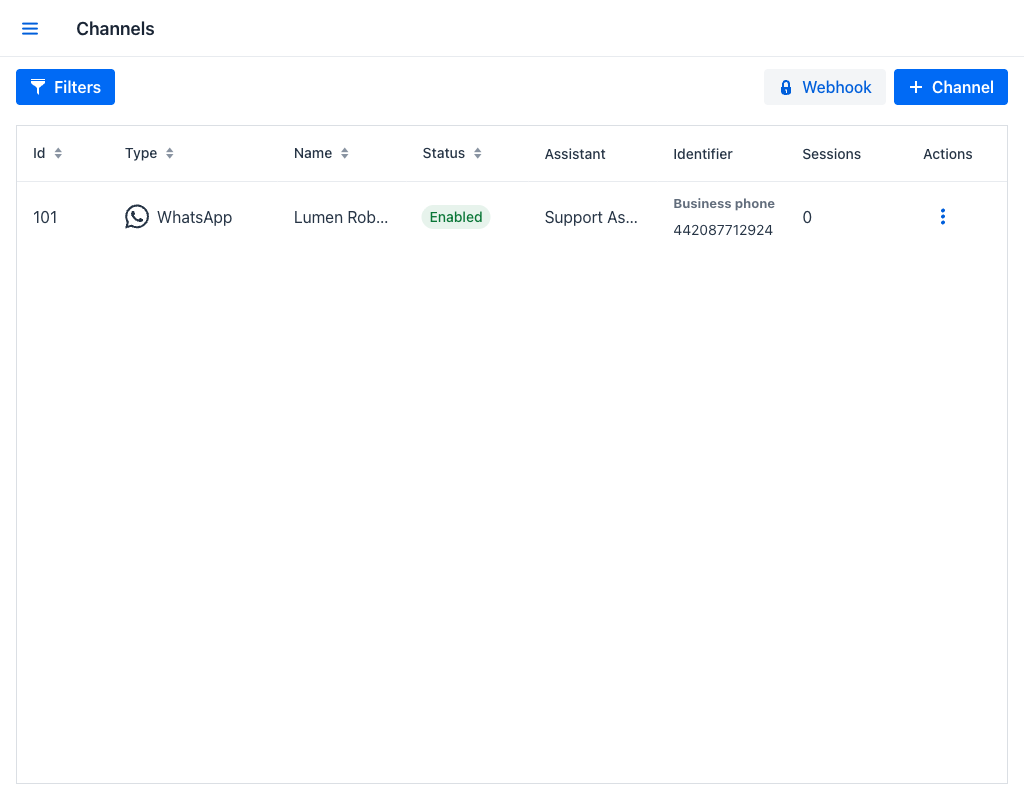
Channels Grid
The grid lists all configured channels across all platform types. The following columns are displayed:
- Id: Unique numeric identifier of the channel.
- Type: The platform of the channel, shown with its logo: WhatsApp, Facebook, or Instagram.
- Name: The administrator-assigned name for this channel configuration.
- Status: A badge indicating whether the channel is enabled, disabled, or failed. Failed means the channel could not deliver its last reply; the badge's tooltip explains that the channel is paused and that editing it will retry.
- Assistant: The AI assistant assigned to handle conversations received through this channel.
- Identifier: The platform-specific identifier, labelled per platform — Business phone for WhatsApp, Page id for Facebook, and Account id for Instagram.
- Sessions: The number of conversation sessions that have been received through this channel.
- Actions: A per-row actions menu.
Filters
The view provides the following filter fields:
- Name: Filters channels whose name contains the entered text.
- Type: A dropdown to filter by channel type (WhatsApp, Facebook, or Instagram).
- Assistant: A searchable dropdown to filter by the assistant assigned to the channel.
- Status: A dropdown to filter by enabled or disabled status.
Once any filter field has a value, the Filter and Clear buttons become active.
At the top right of the filter area, the + Channel button opens the channel creation dialog. The Webhook button opens the webhook configuration dialog for Meta platforms.
Row Actions
Click the actions menu on any row to access the following options:
- Edit: Opens the channel configuration dialog with the current values pre-filled.
- Set as healthy: Clears the failed status. It appears only on channels currently marked Failed.
- Enable / Disable: Toggles the channel's active status. Disabled channels do not receive or process incoming messages.
- Delete: Removes the channel configuration. If the channel has linked sessions, the system presents additional options before confirming deletion.
Warning
Deleting a channel is a permanent action. If the channel has linked sessions, the Delete channel with linked sessions dialog reports how many are affected and offers two choices: Unlink them, which keeps the conversations and their messages but removes the channel reference, or Delete them, which removes the channel together with all of its sessions. Each choice is confirmed separately, and deleting the sessions cannot be undone.
Delivery Failures
Replies are sent back to the originating platform, and delivery can fail. AI Support distinguishes the cases so that a single bad recipient does not disable a whole channel:
- A failure that looks permanent marks the channel Failed and pauses it: no further replies are sent until the channel configuration is updated and saved, or the Set as healthy action is used. An expired or revoked access token is the usual cause.
- A failure that looks transient is reported without pausing the channel.
- A failure affecting only one recipient is reported with the reason, and the channel keeps working for everyone else.
Attachments are handled separately. When an incoming attachment cannot be downloaded from the platform, the user's message is still processed without it. When an outgoing attachment cannot be sent, the failure is reported with the file name.
Adding and Editing a Channel
Clicking the + Channel button or the Edit action opens a tabbed dialog with one tab per platform type. When creating a new channel, all tabs are available and the desired platform type is selected by switching tabs. When editing an existing channel, only the tab for that channel's platform type is active.
All channel types share the following common fields:
- Name (required): A descriptive name for this channel configuration. Must be unique.
- Enabled: A toggle that determines whether the channel is active. New channels are enabled by default.
- Assistant (required): The AI assistant that will handle conversations received through this channel. The assistant determines which language model, system prompt, and document categories are used when responding to incoming messages.
The platform-specific fields are described in the sections below.
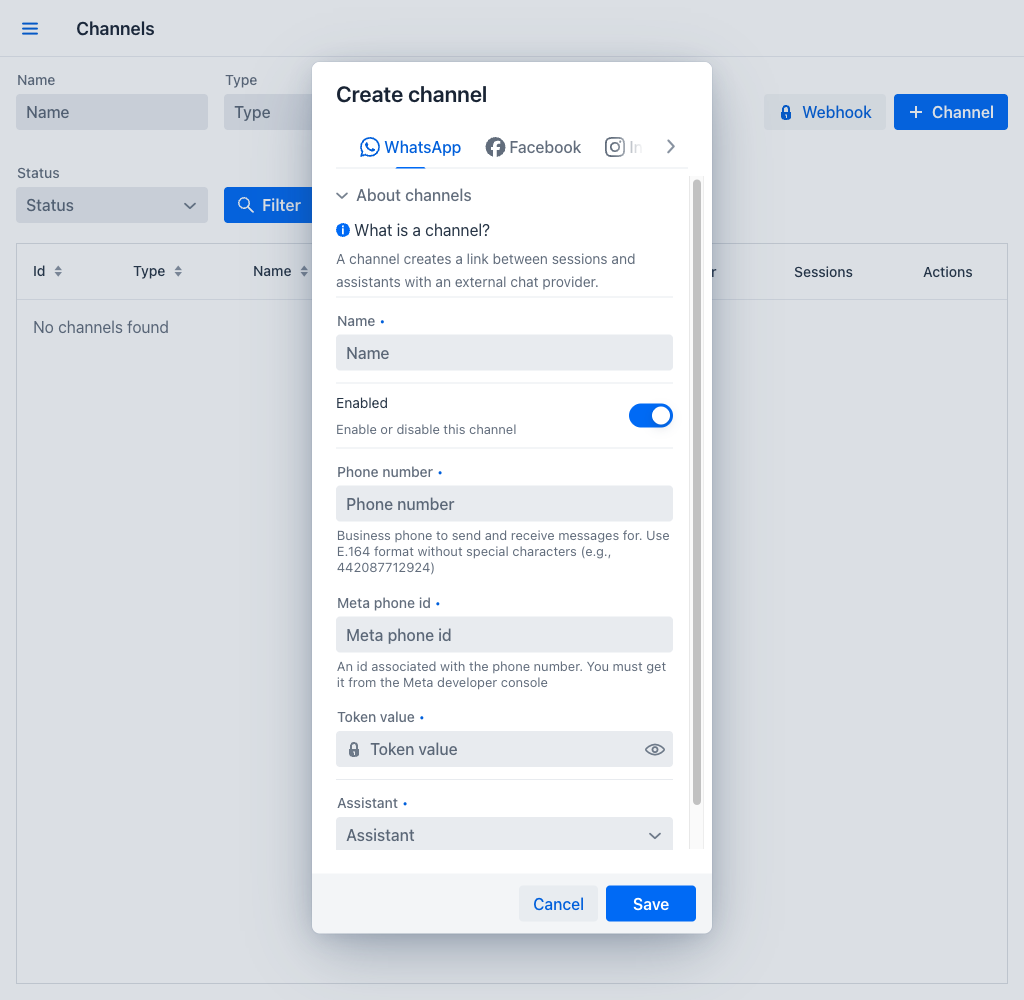
The WhatsApp tab collects the credentials required to connect to a WhatsApp Business account via the Meta Cloud API.
- Phone number (required): The WhatsApp Business phone number in E.164 format without special characters (for example,
442087712924). - Meta phone id (required): The numeric Phone Number ID assigned to this number in the Meta developer dashboard. This identifier is used to send outbound messages.
- Token value (required): Under the Access token section, the permanent access token for the Meta app that has the WhatsApp Business API permission. The field is masked; use the reveal button to view the value.
The Facebook tab collects the credentials for a Facebook Page integration.
- Page ID (required): The numeric identifier of the Facebook Page that will send and receive messages. This can be found in the page's About section or the Meta developer dashboard.
- Page access token (required): The page access token with
pages_messagingpermission. The field is masked; use the reveal button to view the value.
The Instagram tab collects the credentials for an Instagram professional account integration, under an Account configuration section.
- Instagram account ID (required): The numeric ID of the Instagram Business Account that will send and receive messages. This ID is available in the Meta developer dashboard.
- Facebook Page access token (required): The access token of the Facebook Page linked to this Instagram Business Account. The field is masked; use the reveal button to view the value.
- Facebook Page ID (optional): The Facebook Page linked to this Instagram Business Account.
Webhook Setup (Meta Platforms)
WhatsApp, Facebook, and Instagram channels receive incoming messages via Meta webhooks. After creating a channel, you must register the application's webhook endpoint in the Meta developer dashboard so that Meta can forward messages to the AI assistant.
Click the Webhook button in the top toolbar to open the webhook configuration dialog. The dialog has one tab per Meta platform. Each tab displays two read-only fields:
- Callback URL: The full URL of this application's webhook endpoint for the platform. Copy this value into the Callback URL field when configuring the webhook in the Meta developer dashboard.
- Verify Token: The token that Meta will use to verify the webhook subscription. Copy this value into the Verify Token field in the Meta developer dashboard.
The verify token is configured in the application's application.properties using the following properties:
appjars.aisupport.integrations.whatsapp.verify-token=<your_token>
appjars.aisupport.integrations.facebook.verify-token=<your_token>
appjars.aisupport.integrations.instagram.verify-token=<your_token>
The webhook endpoints are fixed at the following paths relative to the application root:
| Platform | Webhook path |
|---|---|
api/webhooks/whatsapp |
|
api/webhooks/facebook |
|
api/webhooks/instagram |
Copy buttons are available next to each field to copy the values to the clipboard without having to select the text manually.
Warning
Each platform's webhook endpoint must be switched on in the application configuration before it exists. Creating a channel in this view is not enough on its own.
appjars.aisupport.integrations.whatsapp.enabled=true
appjars.aisupport.integrations.facebook.enabled=true
appjars.aisupport.integrations.instagram.enabled=true
All three default to false. While a platform is switched off, its callback URL returns a not-found response, Meta cannot verify the subscription, and incoming messages are never delivered — even though the channel appears correctly configured and enabled in the grid. Enable only the platforms actually in use, and restart the application after changing these properties.
Configuring the Meta side of the integration — creating the app, granting permissions, and generating tokens — is covered in Setting up Meta Channels.