Setting up Meta Platform Channels: WhatsApp, Messenger and Instagram
A channel is a connection between AI Support and an external chat provider. Once a channel is configured, conversations held on the external platform are forwarded to AI Support as webhook events and materialise as regular sessions — one session per external contact, mirroring the conversation on the other side: if two different customers write to the connected account, two sessions are created. Operators can read and answer those conversations from the host application, and the assistant assigned to the channel can reply automatically, backed by the full AI Support feature set — knowledge base, models, prompts.
In short, channels centralise external conversations in one place and let you manage, supervise or fully automate them without leaving the host application.
Conversations flow naturally back and forth:
- The assistant doesn't jump on the first message. People write in bursts — three short messages instead of one tidy paragraph. The assistant waits for the burst to finish and answers everything at once.
- No message is lost mid-thought. If a customer writes while the assistant is still generating, the new message is queued and answered immediately after.
- Customers see a typing indicator while the assistant prepares its reply, just like chatting with a person.
- Attachments flow both ways. Files and media sent by the customer appear in the session, and attachments sent from AI Support are delivered back.
- Humans stay in control. Operators can pause the assistant on any session — and if you reply to a customer yourself from the external app (say, directly from Instagram), the assistant notices and steps aside for that conversation automatically.
AI Support has first-class support for the Meta platform — WhatsApp, Facebook Messenger and Instagram. More providers will be added in future releases, and a specific integration can be built on demand if you need one.
Free mode
Channels are available in free mode, subject to messaging limits. Incoming external messages are always accepted; the limit applies to the outgoing messages — both the replies your operators send and the assistant's automatic replies. See Licensing for details.
What you will learn
This guide covers the whole setup, end to end: creating and configuring the Meta app, wiring its webhooks to the host application, and creating the channels in AI Support.
How a message travels
- A customer sends a message on WhatsApp, Messenger or Instagram.
- Meta forwards it as a webhook event to a public endpoint of the host application.
- AI Support finds (or creates) the session for that contact and stores the message.
- The channel's assistant generates a reply — unless the session has been switched to manual.
- The reply travels back through the Meta Graph API and reaches the customer as an ordinary chat message.
Two pieces of configuration make this loop work:
- a webhook configuration (a callback URL plus a verify token), so Meta can deliver events to your application, and
- an access token, so your application can send replies through Meta on behalf of your business.
Basic terminology
Meta's console uses a vocabulary of its own. Here is the minimum you need to navigate it confidently — details live in the Meta documentation:
| Term | What it is |
|---|---|
| Developer account | Your personal account on Meta for Developers. Everything below is created and managed from it. |
| App | A container and configuration dashboard that connects your project to Meta's APIs. Your webhooks, permissions and tokens all live inside an app. |
| Use case | A pre-packaged bundle of APIs, permissions and features that you add to an app — for example "Connect with customers through WhatsApp" (more on use cases). |
| Business portfolio | The container for your business identity and its assets — Facebook Pages, Instagram profiles, WhatsApp numbers, ad accounts. Linking your app to one is required to use the messaging APIs (about portfolios). |
| Permission | A capability granted to your app, such as pages_messaging. Permissions are enabled per use case. |
| Webhook subscription | The list of event types (Meta calls them fields) that Meta forwards to your endpoint. For channels, the field that matters is messages. |
| Access token | A secret string your app presents when calling Meta APIs on behalf of your Page, account or phone number. |
Before you start
Make sure you have the following in place:
- A publicly reachable host application, served over HTTPS. Meta refuses to deliver webhooks to private or plain-HTTP endpoints, and self-signed certificates are not supported (Meta webhook requirements). For local development, a tunnelling tool such as ngrok works well.
- The application properties below configured. Each integration is disabled by default, so enable the ones you want to use; the verify tokens are secret strings you invent — you will paste the same values into the Meta console later. The app secret is different: it is issued by Meta, it is read from the app you create in Step 1, and it is required for every Meta channel.
- A Meta developer account and a business portfolio (see the glossary above).
- The business asset for each platform you want to connect (see the table in Step 1).
- At least one assistant configured in AI Support — it will be answering the conversations.
Application properties
Channel behaviour is configured through the following application properties:
| Property | Purpose | Default |
|---|---|---|
appjars.aisupport.integrations.whatsapp.enabled |
Enables the WhatsApp integration and its webhook endpoint | false |
appjars.aisupport.integrations.whatsapp.verify-token |
Verify token for the WhatsApp webhook | — |
appjars.aisupport.integrations.facebook.enabled |
Enables the Facebook integration and its webhook endpoint | false |
appjars.aisupport.integrations.facebook.verify-token |
Verify token for the Facebook webhook | — |
appjars.aisupport.integrations.instagram.enabled |
Enables the Instagram integration and its webhook endpoint | false |
appjars.aisupport.integrations.instagram.verify-token |
Verify token for the Instagram webhook | — |
appjars.aisupport.integrations.meta.app-secret |
App secret of the Meta app, used to authenticate incoming webhook payloads. Required: it has no default, and a payload whose signature does not match is rejected | — |
appjars.aisupport.public-url |
Public base URL of the host application. Required to send attachments through Instagram channels; if blank, outgoing Instagram attachments are skipped. Example: https://app.dev |
(empty) |
appjars.aisupport.integrations.locale |
Locale of the system messages posted in channel sessions | en |
com.appjars.aisupport.url.views.channels |
Route of the Channels view | as/channels |
The Channels view and the Webhook dialog
Open the Channels view in the host application (default route as/channels, see Route Configuration). The toolbar has the two buttons used throughout this guide:
Clicking Webhook opens a dialog that shows, per platform, the exact Callback URL and Verify Token to paste into the Meta console — with copy buttons. Keep it open in a second tab while you work; you will need both values several times.
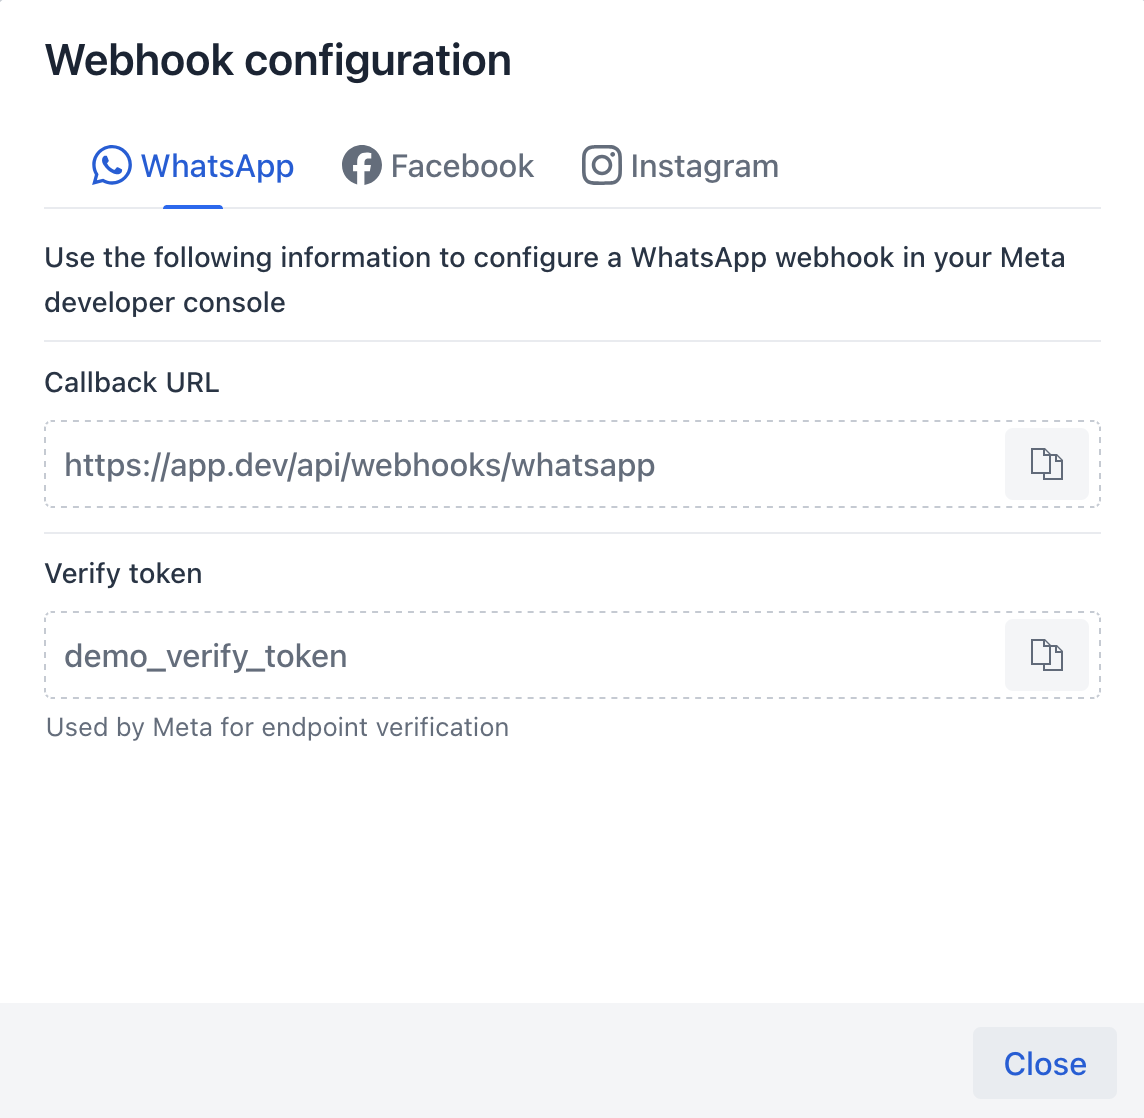
For reference, the webhook endpoints are fixed, relative to the application root:
| Platform | Webhook path |
|---|---|
api/webhooks/whatsapp |
|
api/webhooks/facebook |
|
api/webhooks/instagram |
About the Meta console
Names, menus and links in the Meta console change often. This guide was written against the English version of the console and Graph API v25.0; if a screen does not match what you see, the official Meta documentation is the best place to check.
Step 1 — Create the Meta app
Follow Meta's app creation guide. Along the way you will:
- Enter the app details — a name and a contact email.
-
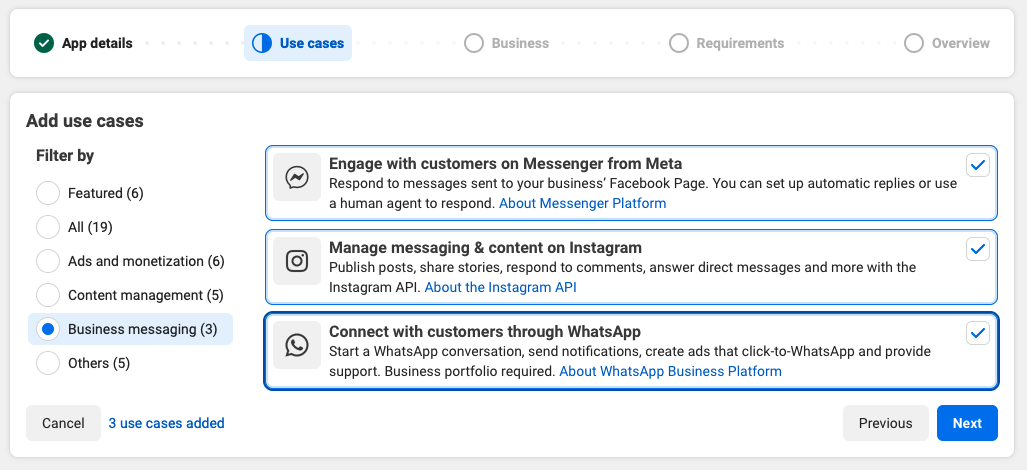
Select use cases. Filter by Business messaging and select the ones you want to turn into channels:
Use case Requires Becomes this channel Connect with customers through WhatsApp A business phone number WhatsApp Engage with customers on Messenger from Meta A Facebook business Page Facebook Manage messaging & content on Instagram A professional Instagram account linked to a Facebook Page (how to link) Instagram -
Link a business portfolio, which holds the assets above and verifies your business identity.
Set the Graph API version
AI Support targets Graph API v25.0, so we recommend pointing the whole app at that version. This is recommended rather than mandatory — the integration may still work on v24.0 — but matching versions avoids surprises. In your App dashboard, open the main navigation drawer and click App settings (the gear icon) → Advanced. Under Upgrade API version select v25.0 for all calls and save.
Customize the use cases
Once the app is created, open Use cases → Customize in the developer console. Each use case is configured independently and each section below is self-contained, so jump straight to the platform you need:
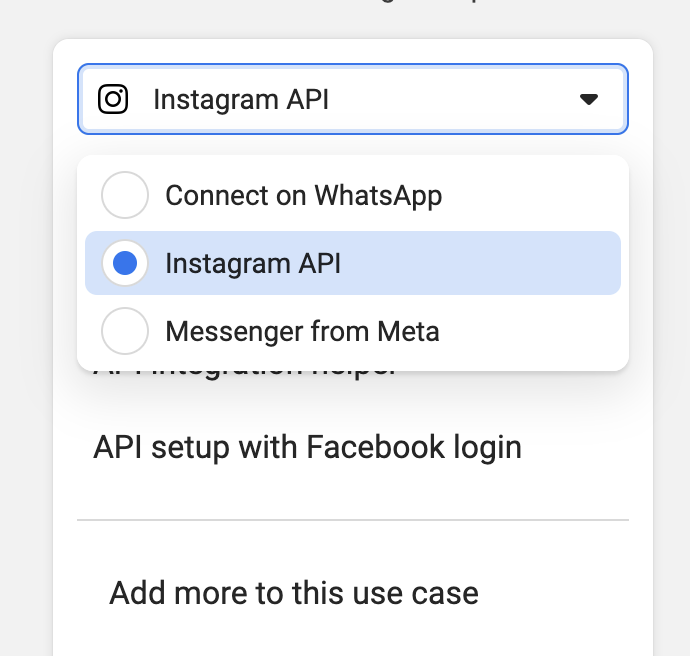
You can switch between use cases at any time with the selector at the top of the left sidebar.
Every step counts
Within the platform you are configuring, every step is mandatory unless marked otherwise. Skipping one usually does not fail loudly — it shows up later as sessions that are never created or replies that are never delivered. If the Meta console itself behaves strangely, check the Meta documentation and developer support.
Step 2A — Messenger
Use case: Engage with customers on Messenger from Meta. Outcome: direct messages sent to your Facebook Page become AI Support sessions.
1. Enable the permission
Open Permissions and features. Some permissions may already be enabled by default; keeping the list to the minimum required makes the configuration easier to manage. AI Support will need:
pages_messagingpages_manage_metadatapublic_profile
Find them in the list and click + Add. A permission is active once its status changes to Ready for testing.

2. Configure the webhook
Open Messenger API Settings and expand 1. Configure webhooks:
- Callback URL — copy it from the Facebook tab of the Webhook dialog in the Channels view.
- Verify token — copy it from the same dialog. It is the value you configured in the application properties.
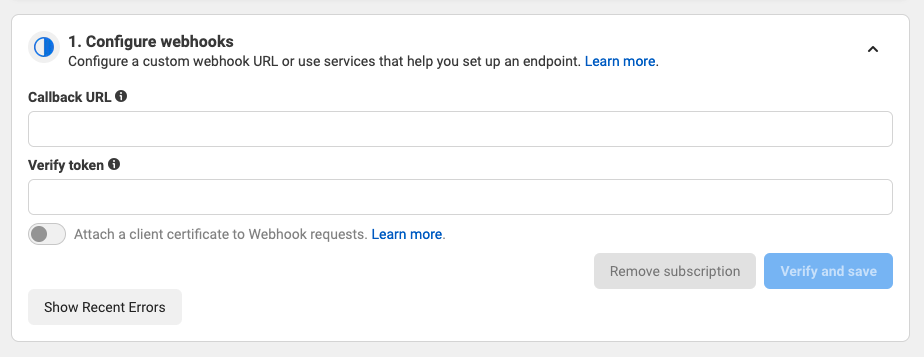
Press Verify and save. Meta immediately sends a verification request to your endpoint, which must echo the token back — AI Support handles this automatically. On success the fields are greyed out and locked in.
Verification failed?
Meta could not reach your endpoint, or the token did not match. Re-check the Before you start list — public HTTPS URL, integration enabled, matching verify token — and see Troubleshooting for a systematic diagnosis.
Below the form there is a Webhook fields list: it controls which event types Meta forwards to your endpoint, and without a subscribed field your webhook stays silent. Select v25.0 in the version dropdown and turn the Subscribe switch on for the messages field.

3. Connect your Page and subscribe to messages
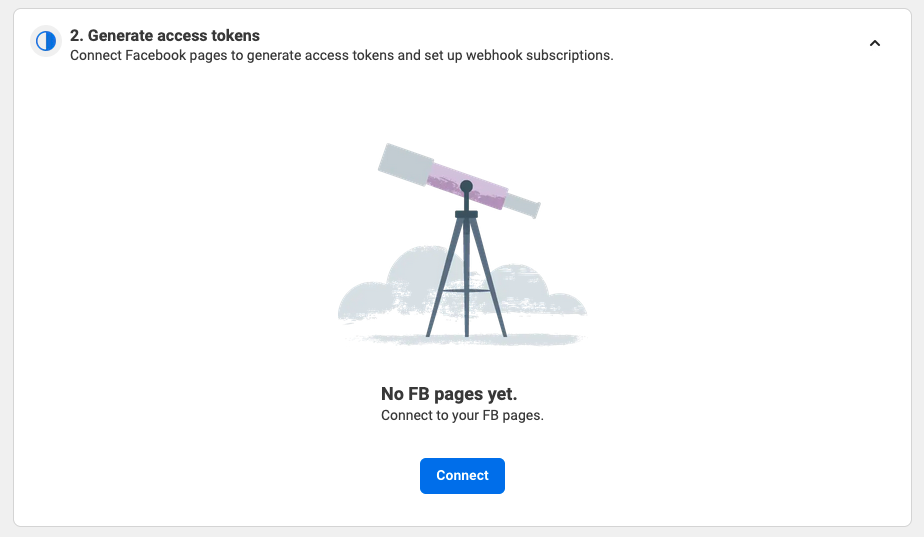
Expand 2. Generate access tokens and click Connect. You will be asked to log in with the business account that owns the Page and to grant access to it. After closing the prompt, the Page appears in the list.
Page not showing in the list?
The current user may lack the permissions needed to access the Page at either the App or Business level. Verify your access rules and assigned assets in the Meta Business Manager.
Copy for later: the Page ID — the number shown under the Page name.
Next, in the Webhook Subscription column of your Page's row, click Add Subscriptions and select the messages and message_echoes fields. This is a per-Page subscription, separate from the app-level Webhook fields you set earlier — both are required, and without this one your endpoint stays verified but silent. After saving and reloading the page, the column must list the fields you just subscribed.
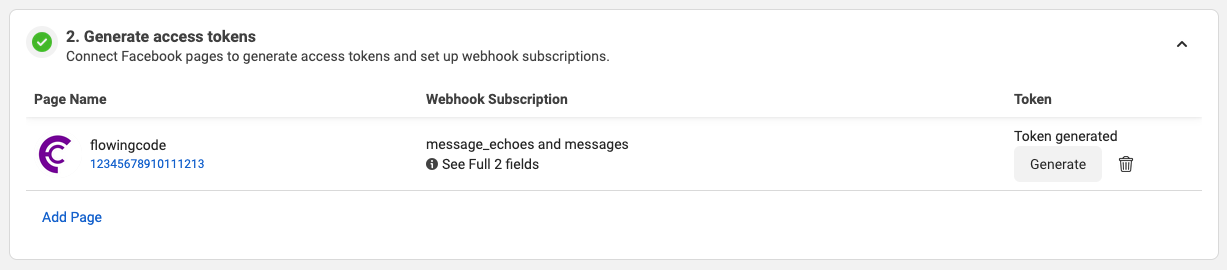
Still says No fields subscribed?
Your account may be missing a permission, or a feature Meta requires for subscriptions. Review the permission step and, if it persists, consult the Messenger webhooks documentation and Meta support.
4. Generate the access token
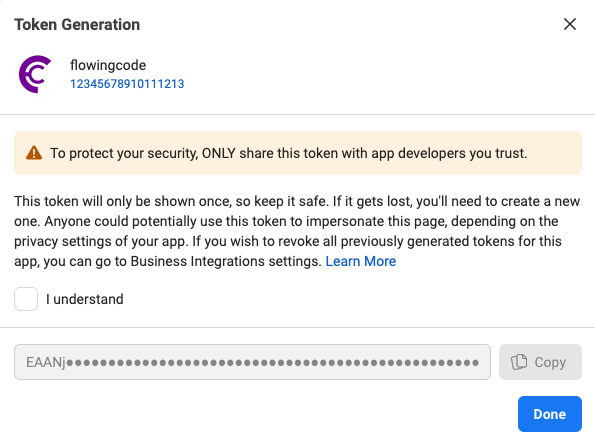
In the Token column of your connected Page, click Generate. You will be asked to sign in once more and grant access. A dialog then displays the token.
Copy for later: the access token — it is shown only once. If you lose it, simply generate a new one.
The remaining sections of this use case (API integration helper, Instagram settings, Add more to this use case) are not needed for a Messenger channel.
Checkpoint — before moving on, you should have:
| Collected | You will paste it into |
|---|---|
| Page ID | The Page ID field of the Facebook channel |
| Access token | The Page access token field of the Facebook channel |
…plus the permissions enabled, the webhook verified, and the messages and message_echoes fields subscribed. Continue with Step 3 — Publish the app.
Step 2B — Instagram
Use case: Manage messaging & content on Instagram. Outcome: Instagram direct messages become AI Support sessions.
Prerequisites
The Instagram account must be a professional account and must be linked to a Facebook Page (how to link).
Instagram messaging has one quirk worth understanding upfront: your app receives messages through the Instagram account, but sends replies through the linked Facebook Page. That is why this section configures both sides, and why part of the work happens inside the Messenger from Meta use case.
1. Enable the permissions
Open Permissions and features. Some permissions may already be enabled by default; AI Support needs all of the following — find any missing one in the list and click + Add; a permission is active once its status changes to Ready for testing:
business_managementinstagram_basicinstagram_business_basicinstagram_business_manage_commentsinstagram_business_manage_messagesinstagram_manage_messagespages_show_listpublic_profile
2. Configure the webhook
Open API setup with Instagram login and expand its Configure webhooks section:
- Callback URL — copy it from the Instagram tab of the Webhook dialog in the Channels view.
- Verify token — copy it from the same dialog. It is the value you configured in the application properties.
Press Verify and save. Meta sends a verification request to your endpoint — AI Support answers it automatically — and on success the fields are greyed out. As the console itself points out, webhooks are only delivered while the app is in published state — see Step 3.
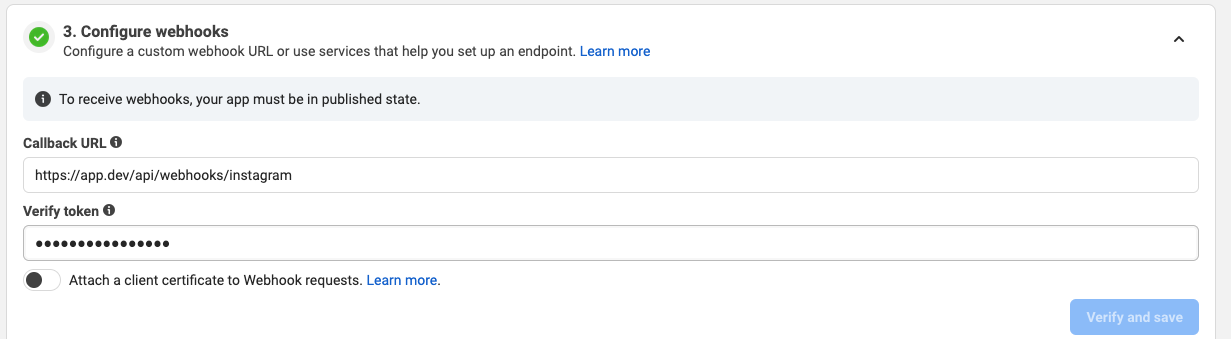
Below the form there is a Webhook fields list: it controls which event types Meta forwards to your endpoint, and without a subscribed field your webhook stays silent. Select v25.0 in the version dropdown and turn the Subscribe switch on for the messages field.
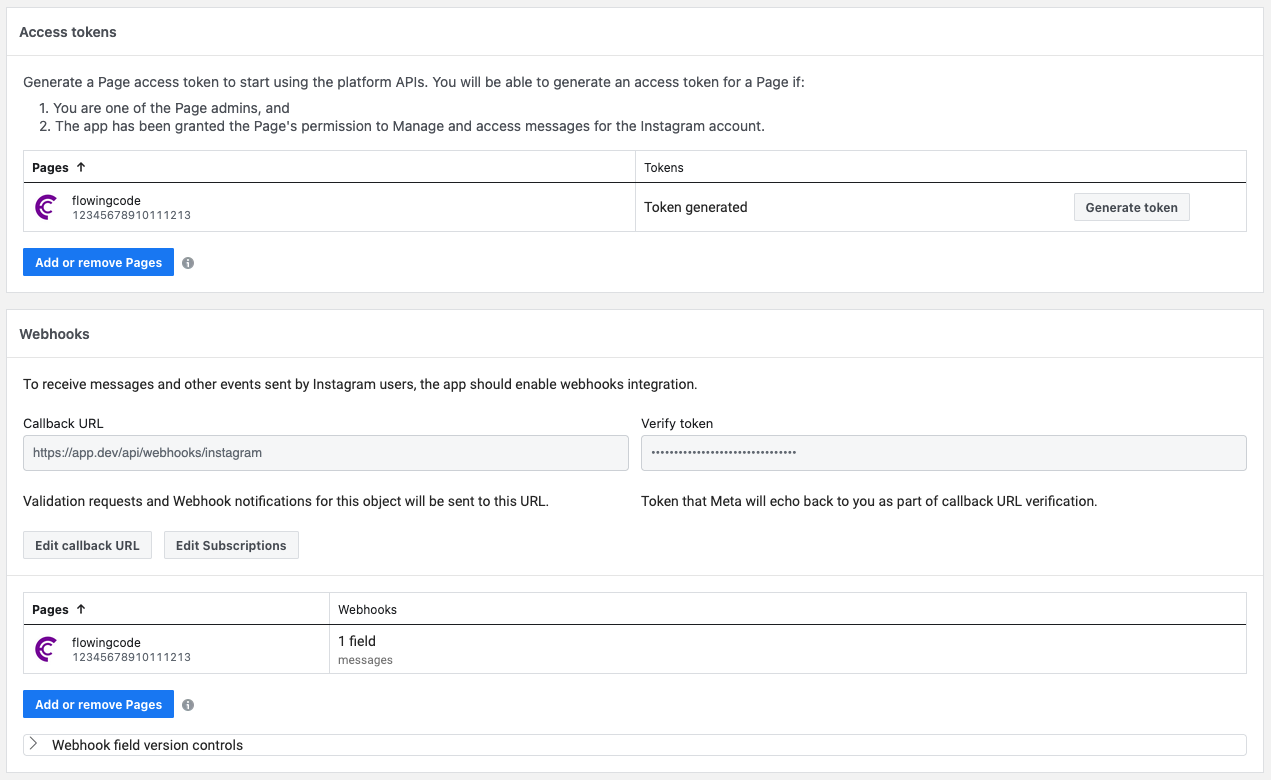
3. Connect the Instagram account
Still in API setup with Instagram login, add the account that will receive messages.
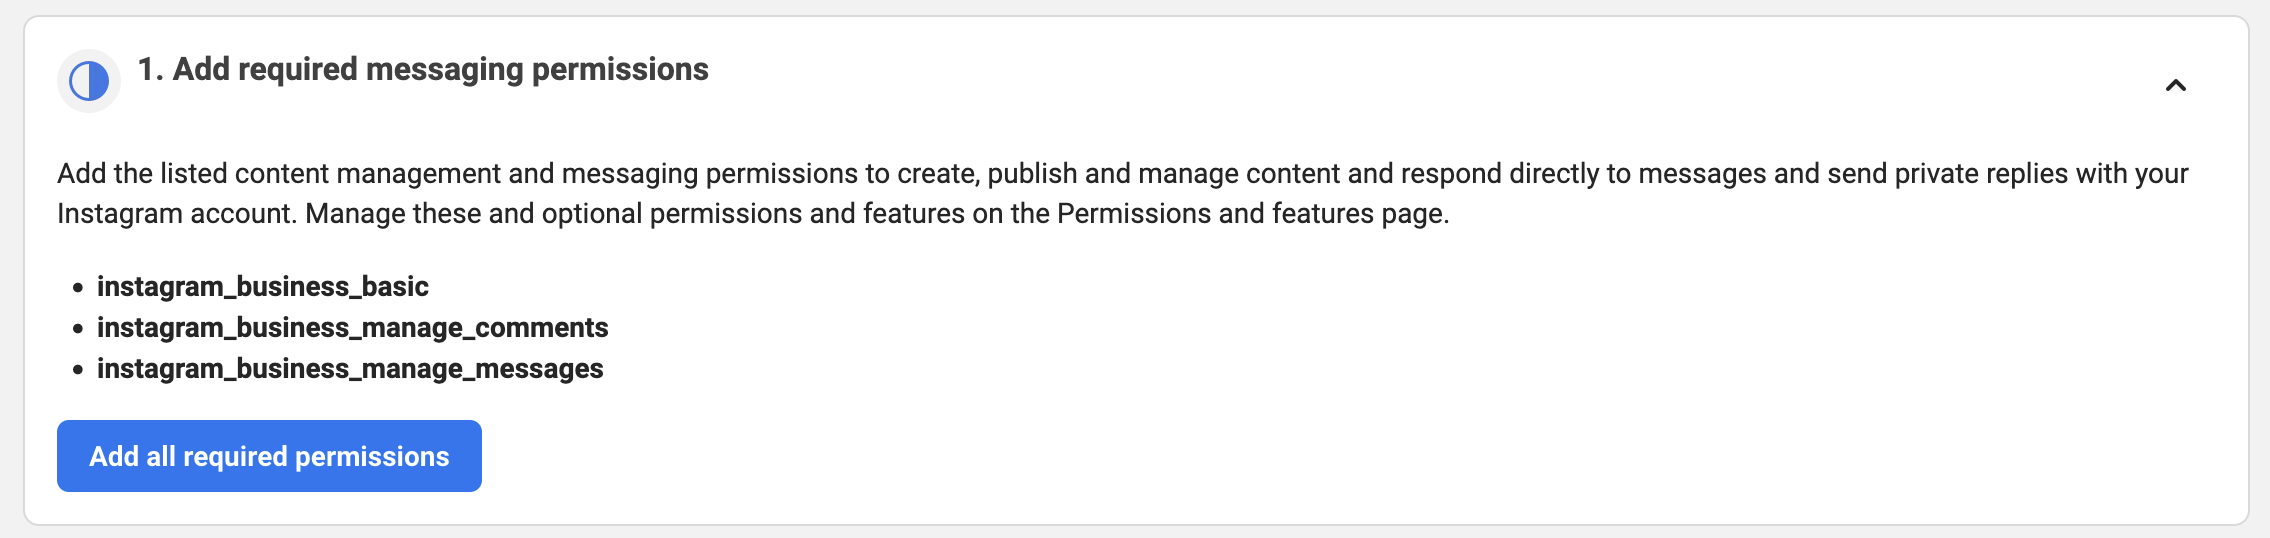
Add required messaging permissions. Press the Add all required permissions button. This step is required even if the permissions already appear in Permissions and features. Once granted, the step indicator turns from a half-moon into a green check.
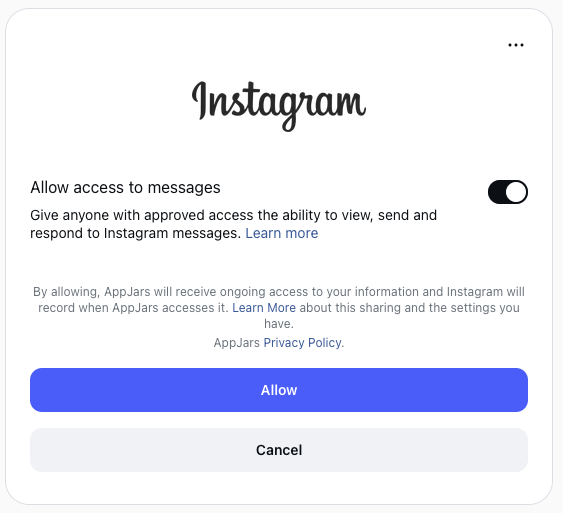
Generate access tokens. Click Add account and sign in with the Instagram account's credentials. During the login flow, keep Allow access to messages enabled and press Allow.
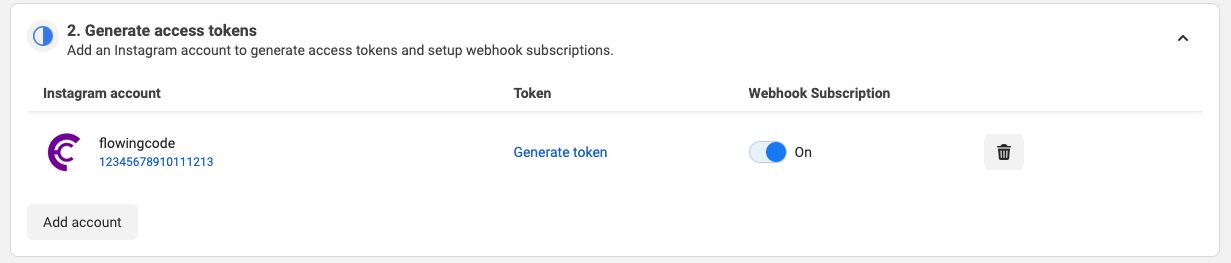
After closing the prompt and reloading the page, the account appears in the list.
Copy for later: the Instagram account ID — the number shown under the account name.
Then turn on the switch in the Webhook Subscription column, so Meta forwards this account's events to your app.
Account disappears after reloading?
The account probably does not meet the prerequisites (professional account, linked to a Page) or is missing a permission. Verify both, and contact Meta support if the problem persists.
4. Get the access token from the linked Facebook Page
Because replies are sent through the linked Page, the token AI Support needs is a Page access token, and it is generated from the Messenger use case:
- Switch to the Messenger from Meta use case (selector at the top of the sidebar).
- Open Instagram settings → Access tokens.
- Click Add or remove Pages and sign in with the Facebook account that owns the Page linked to your Instagram account, granting access to that Page.
-
The Page appears in the list below.
Copy for later: the Page ID — the number shown under the Page name.
-
Click Generate in the token column and sign in once more to authorise.
Copy for later: the access token — it is shown only once. If you lose it, generate a new one.
-
Still in Instagram settings, go to the Webhooks section and click Add callback URL. Fill in the same Instagram Callback URL and Verify token as before — from the Instagram tab of the Webhook dialog in the Channels view. The fields are greyed out once validation succeeds.
- In the Pages list of the same Webhooks section, the subscriptions of your Page must include the
messagesfield: click Edit Subscriptions, selectmessagesand confirm. After saving, the Page's row must show the field (for example, 1 field — messages).
The remaining sections (API integration helper, API setup with Facebook login, Add more to this use case) are not needed for an Instagram channel.
Checkpoint — before moving on, you should have:
| Collected | You will paste it into |
|---|---|
| Instagram account ID | The Instagram account ID field of the Instagram channel |
| Page access token | The Facebook Page access token field of the Instagram channel |
| Page ID | The Facebook Page ID field of the Instagram channel (optional) |
…plus the permissions enabled, the account connected with its webhook subscription on, and the webhook verified — with the messages field subscribed — in both places. Continue with Step 3 — Publish the app.
Step 2C — WhatsApp
Use case: Connect with customers through WhatsApp. Outcome: messages sent to your business phone number become AI Support sessions.
About WhatsApp Coexistence
Registering a phone number as described below dedicates it to the API: the number can no longer be used with the WhatsApp Business App. Meta offers WhatsApp Coexistence to run both in parallel, but it requires a different onboarding flow that is not covered by this tutorial.
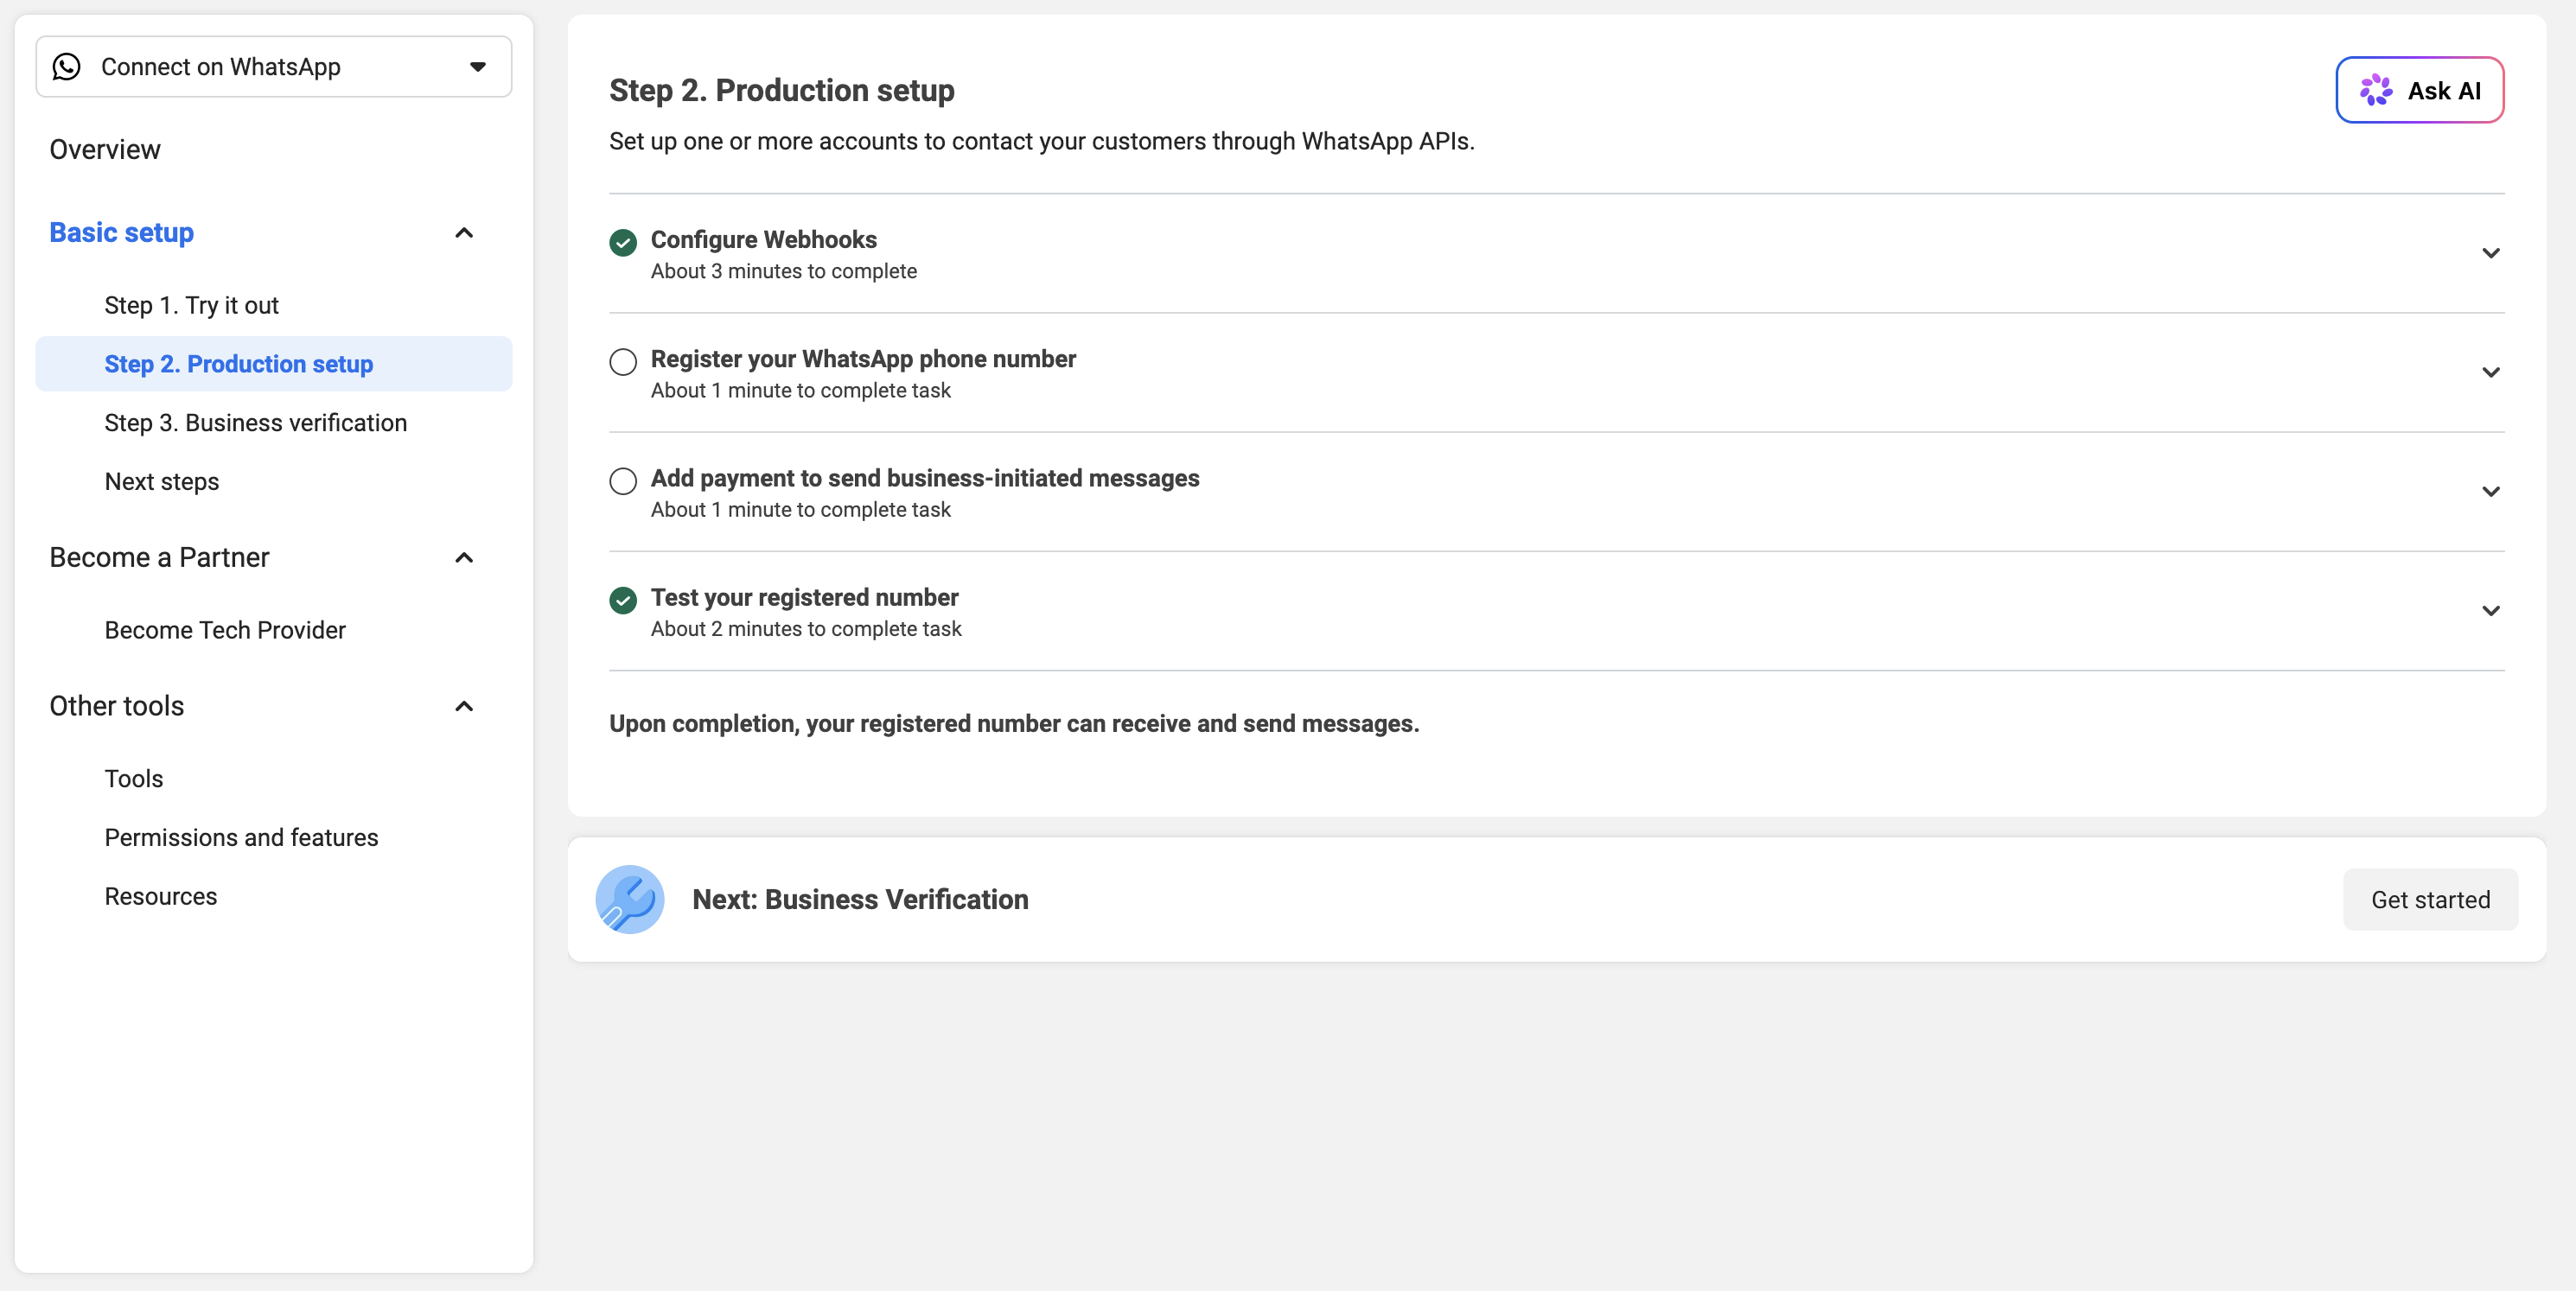
Open the use case and go to Basic setup → Step 2: Production setup.
1. Configure the webhook
Expand Configure Webhooks:
- Callback URL — copy it from the WhatsApp tab of the Webhook dialog in the Channels view.
- Verify token — copy it from the same dialog. It is the value you configured in the application properties.
Press Verify and save. Meta sends a verification request to your endpoint — AI Support answers it automatically — and on success the fields are greyed out.
Then, in the Webhook fields list below (it controls which event types Meta forwards to your endpoint), select v25.0 in the version dropdown and turn the Subscribe switch on for the messages field.
2. Register your phone number
Expand Register your WhatsApp phone number and click Add new number, then complete the phone configuration form. Once registered (reload the page if needed), the number appears in the list below.
Copy for later: the phone number and the phone ID — the phone ID is the number displayed under your registered phone.
3. Generate the access token
Click Generate in the token column of your registered number.
Copy for later: the access token — it is shown only once. If you lose it, generate a new one.
The remaining sections (Business verification, Next steps, Become a partner, Other tools) are not needed for this tutorial.
Checkpoint — before moving on, you should have:
| Collected | You will paste it into |
|---|---|
| Phone number | The Phone number field of the WhatsApp channel |
| Phone ID | The Meta phone id field of the WhatsApp channel |
| Access token | The Token value field of the WhatsApp channel |
…plus the webhook verified and the messages field subscribed. Continue with Step 3 — Publish the app.
Step 3 — Publish the app
Meta lets you test some use cases while the app is still in development mode; others require the app to be published — Instagram webhooks, for example, are only delivered to published apps. In either case, the Graph API behaves more consistently when the app is in published (live) mode, so we recommend skipping development mode entirely and testing with the app published.
To start the process, locate the Publish button in your App dashboard and click it. You may be required to fill additional details about your business before Meta allows your App to go live.
Publishing makes the app's features accessible to users outside your internal team. To target real customers in production, however, the app must also go through Meta's review process, in which Meta approves the specific permissions the app uses based on how the app treats user privacy and the information your business provides.
Step 4 — Create the channel in AI Support
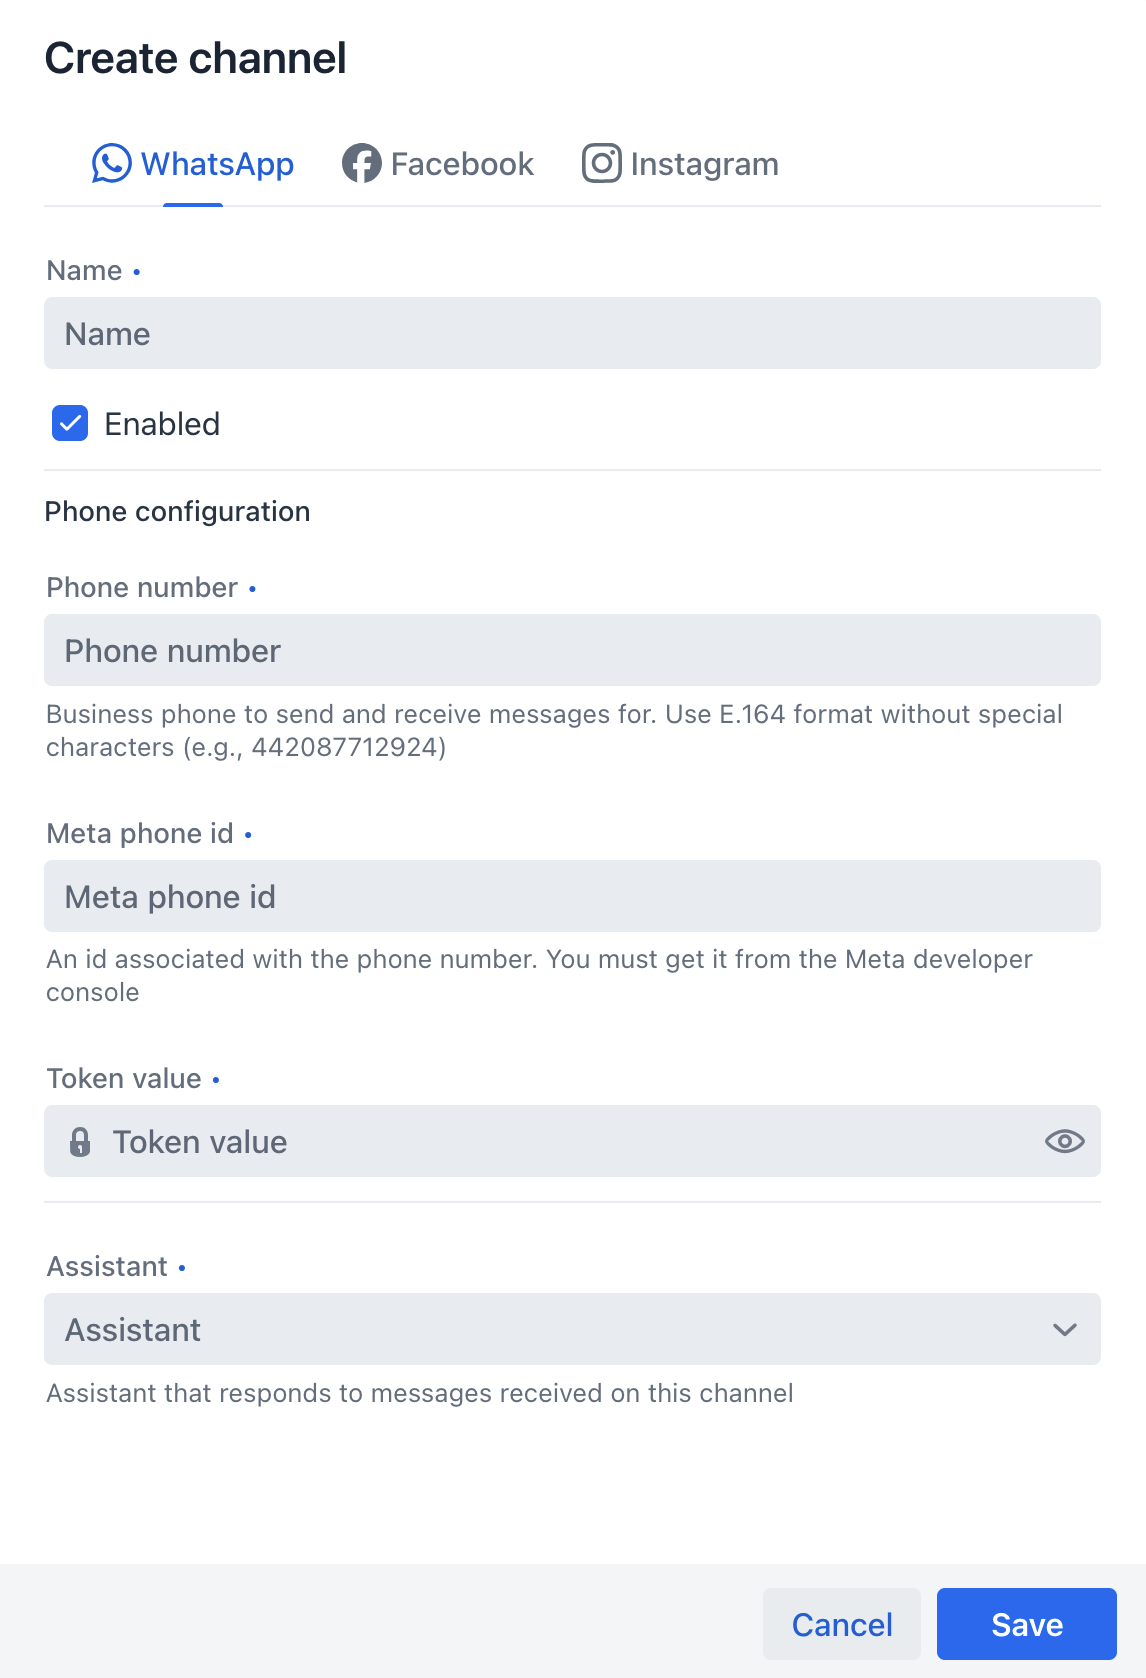
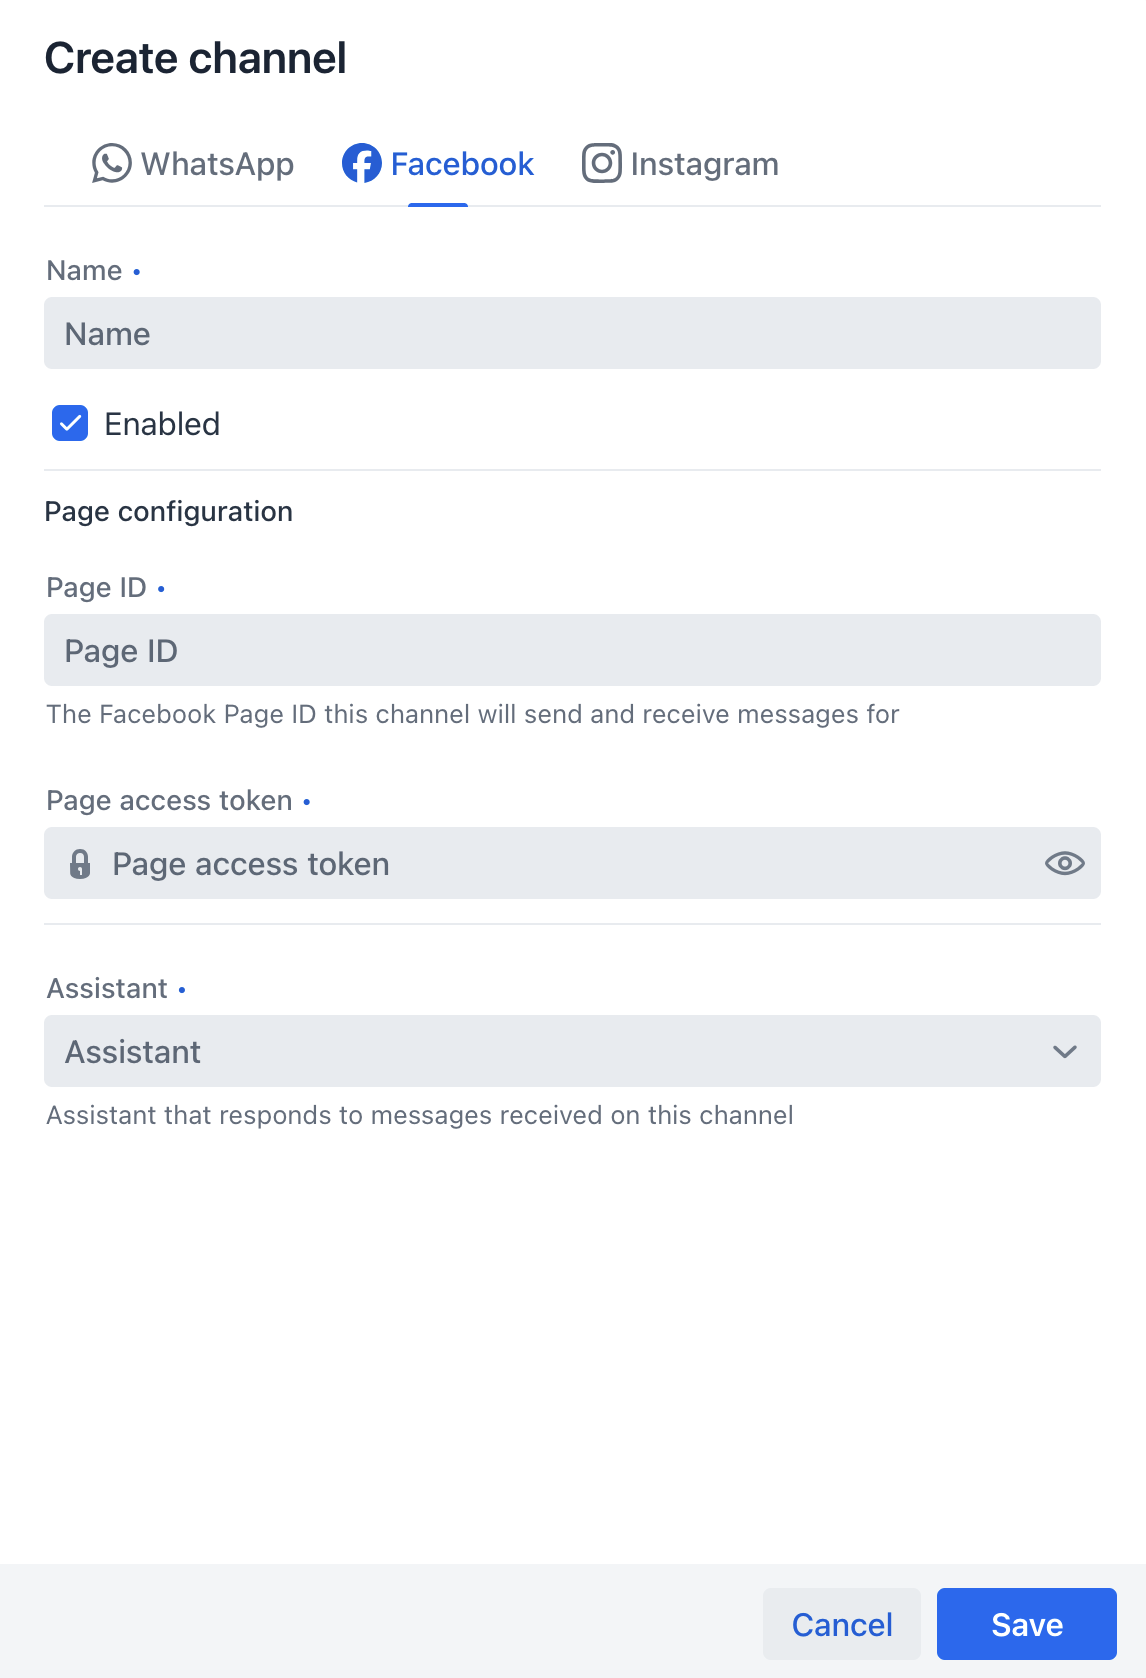
Back in the Channels view of the host application, click + Channel and select the tab for your platform. (Field-by-field details live in the Channels view reference.)
All platforms share three fields: a unique Name, the Enabled flag, and the Assistant that will automatically respond to conversations received on this channel.
WhatsApp channel
- Phone number (required): The registered business phone, in E.164 format without symbols (for example,
442087712924). - Meta phone id (required): The phone ID from your WhatsApp checkpoint.
- Token value (required): The access token.
Facebook channel
- Page ID (required): The Page ID from your Messenger checkpoint.
- Page access token (required): The access token.
Instagram channel
- Instagram account ID (required): The account ID from your Instagram checkpoint.
- Facebook Page access token (required): The Page access token of the linked Page.
- Facebook Page ID (optional): The linked Page's ID.
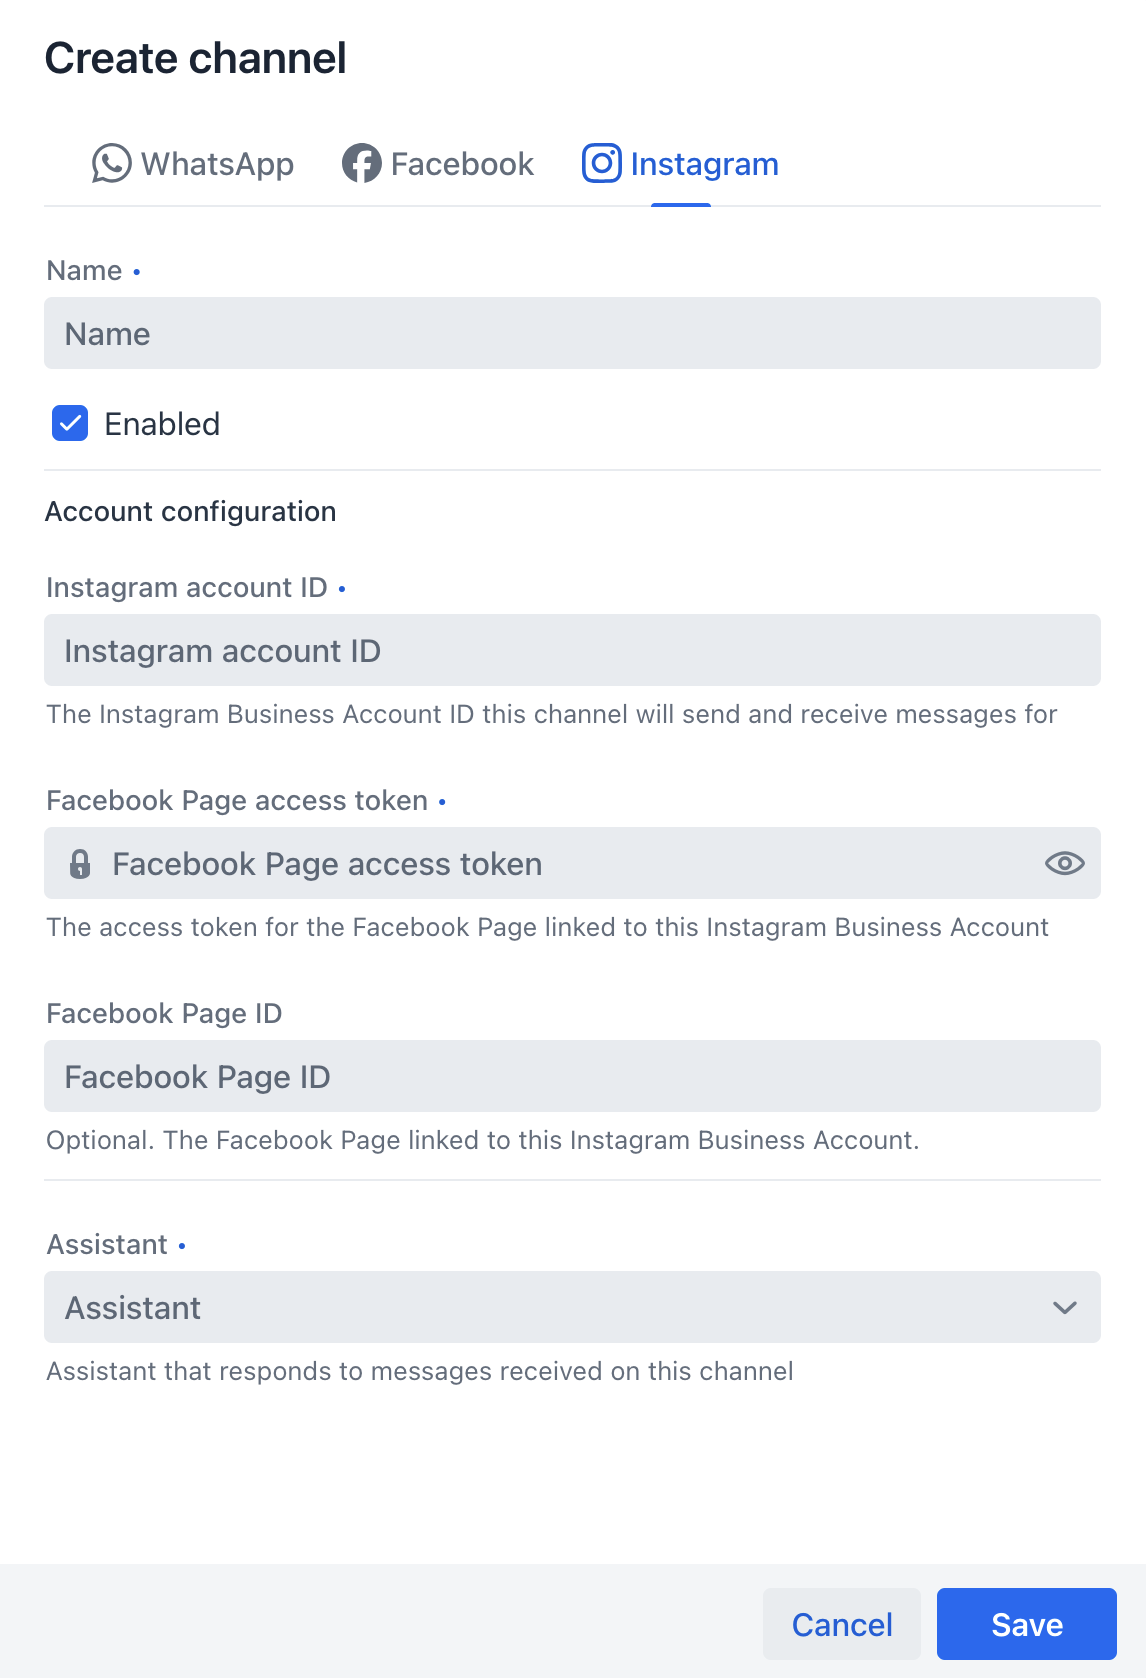
Linking the Instagram account to a Facebook Page is mandatory in the Meta console, but supplying that Page's ID here is optional.
Click Save. The channel appears in the grid with an Enabled status.
Step 5 — Test the integration
Send a message to your Page, Instagram account or business phone from a regular user account, and verify each link of the chain:
- A session is created in AI Support, linked to the channel, with the incoming message visible.
- The assigned assistant replies automatically, and the reply arrives on the external platform.
- An operator can answer manually from the session, and the message is delivered.
- Attachments flow both ways: media sent by the external user shows up in the session, and attachments sent from AI Support are delivered.
Instagram attachments need a public URL
To send attachments through an Instagram channel, the host application must declare its public base URL via the appjars.aisupport.public-url property — see the application properties. If the property is blank, outgoing Instagram attachments are skipped.
If any check fails, see Troubleshooting below.
Troubleshooting
Channel problems fall into three groups. Identify yours by the symptom:
Sessions are not created or updated
Incoming messages never show up. Work through these in order:
- Check the channel configuration itself. The channel must be Enabled, and its platform identifier (Page ID, Instagram account ID, or phone number and phone ID) must exactly match the asset connected in the Meta console. AI Support matches incoming events by this identifier — a typo means events arrive and are silently dropped.
- Confirm webhook events are reaching the application. Inspect your network traffic to see whether Meta's requests arrive at all, and where they are being forwarded.
- Check the app secret. Every incoming payload is authenticated against its
X-Hub-Signature-256header. A missing or wrongappjars.aisupport.integrations.meta.app-secretmakes the application answer403and log a rejected-signature warning, so the events arrive and are discarded. The value is the App secret of the Meta app, found under App settings > Basic in the Meta console. - Re-check the webhook configuration in the Meta console: callback URL, verify token, and — most commonly forgotten — the
messagesfield subscription. - Confirm the basics: the integration's
enabledproperty, a publicly reachable HTTPS endpoint, and that nothing in front of the application (proxy, firewall, security filter) blocksGETandPOSTrequests on theapi/webhooks/*endpoints.
Messages arrive, but replies are not delivered
This usually comes down to one of two things — a missing permission or an invalid access token. Check them in that order:
- Permissions. Confirm that every permission listed in your platform's permission step was actually granted. If a reply needs a capability the token does not carry, Meta rejects the send.
- Token validity. The token may be invalid because it was temporary and has expired, or because it belongs to the wrong user, Page, or integration.
Regenerate the token in the Meta console and update the channel. Note that on an authentication failure AI Support flags the channel as Failed (visible in the Channels grid) and stops sending until you edit and re-save the channel. To avoid expiry altogether, consider a system user access token.
For the exact cause, read the application logs: AI Support records the Graph API error code and message behind every failed send.
Everything is configured, yet some messages still fail
Even with a correct webhook and token, the Meta API can reject individual messages. AI Support classifies the Graph API error codes and reacts accordingly:
| Category | Example Meta error codes | Scope | Behaviour |
|---|---|---|---|
| Authentication failed | 190, 102, 200, 10 | Permanent — affects the whole channel | Channel is marked Failed; operators are notified |
| Per-recipient | 131026, 131047, 131048, 131051, 131056 | Permanent — affects one recipient (e.g. re-engagement window expired, undeliverable) | A system message is posted in the affected session |
| Rate limited | 4, 613, 80007 | Transient | Retry later; a system message is posted |
| Other | — | Usually transient | Check the application logs |
Check the application logs for the exact error code and consult Meta's error reference, or contact support.
Using a system user access token
The steps above generate a separate access token for each integration — one per Page, Instagram account or phone number. That works, but it is more to keep track of, and Meta is not always explicit about how long each token stays valid.
An alternative is to issue a single token from a system user and reuse it across every channel. A system user is a non-human account that represents the servers, software or automation processes that call Meta's APIs on behalf of the assets — Pages, Instagram accounts, ad accounts — managed by a business portfolio. A token issued to a system user can be set never to expire and can carry the permissions of several integrations at once.
1. Create the system user
In the Meta Business Manager dashboard, open Users → System users and create one. Give it admin access if you intend to generate tokens from it.
2. Assign asset access
Open the system user and assign the assets it needs to act on. For channels this must include the App, the Pages, and the Instagram accounts involved — grant full access to each.
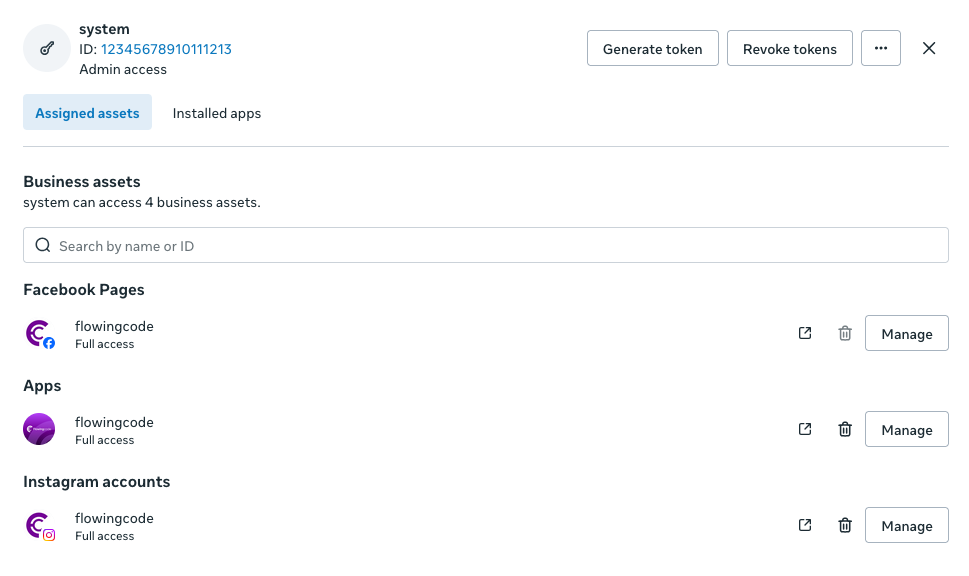
3. Generate the token
Click Generate token and work through the dialog:
- Select the App the token belongs to.
- Choose the expiry. Selecting Never issues a token that does not expire.
- Select the permissions. Include every permission required by the integrations you intend to use — the same ones listed in each platform's permission step above.
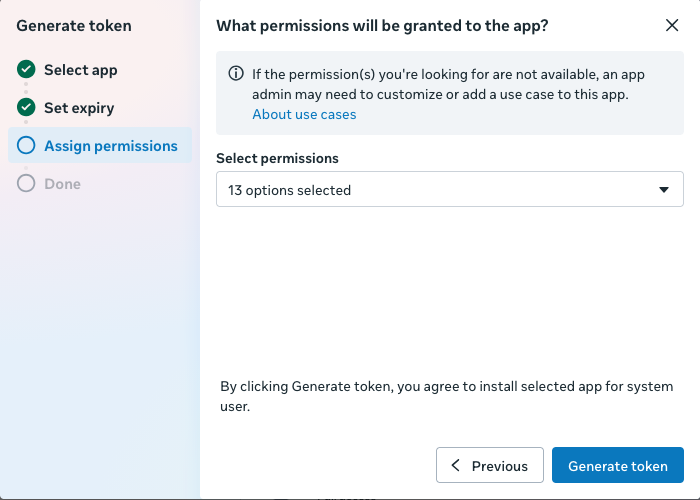
Copy for later: the access token — it is shown only once. If you lose it, generate a new one.
4. Use it in your channels
Paste this single token into the token field of every channel — Token value for WhatsApp, Page access token for Facebook, Facebook Page access token for Instagram — instead of generating one per integration.
Further reading
- Channels view reference — every field, filter, and action in the Channels view
- Assistants — configuring the assistant that answers channel conversations
- Licensing — free-mode messaging limits
- Meta: app development · Webhooks getting started
- Meta: Messenger Platform · Instagram Platform · WhatsApp Cloud API